완벽한 아키텍처는 없다. 하지만 변화에 유연한 구조는 있다.
개발자라면 한 번쯤 이런 고민을 해봤을 것이다. “오늘 내가 내린 설계 결정이 6개월 뒤에 발목을 잡지는 않을까?” 특히 프론트엔드는 기획 변경, API 스펙 변동, 디자인 수정이 빈번한 영역이다. 변경은 불가피하다.
문제는 변경 그 자체가 아니다. 변경의 파급 효과가 문제다. 작은 수정 하나가 10개 파일로 번지고, 예상치 못한 사이드 이펙트가 발생한다. 우리는 이런 구조에서 벗어나고 싶다.
기획이 바뀔 때마다 10개 이상의 파일을 수정해본 적 있는가? 서버 API 필드명 하나 바뀌었는데 모든 컴포넌트를 고쳐야 했던 경험은?
우리 목표는 장학카드 사용자들이 더 잘 활용할 수 있도록 사내 SaaS 툴로 기능을 내재화하는 것이다. 제휴 카드사는 협업 관계이기에 감사하게도 특정 API들을 제공받아 사용하고 있지만, 다른 외부 카드사 서비스에 비하면 아직 API 자체가 빈약하다.
필요한 API들이 제공되지 않아 있는 API로 비효율적이지만 어떻게든 만들어내거나, 카드사의 일정 기약만 믿고 기다리고 있었다. 일정이 불명확하다 보니 기획이 자주 바뀌었다. 여러 API를 조합하고, 불필요한 호출을 반복하고, 데이터 싱크를 맞추는 임시 코드가 쌓여갔다.
팀원들은 잦은 변경에 지쳤다. 변경에 유연한 구조가 필요했다. 나중에 카드사가 제대로 된 API를 제공하면 빠르게 교체할 수 있도록, 외부 의존성을 격리하는 설계가 필수였다.
우리가 알고 있던 것
프로젝트를 시작할 때 우리는 몇 가지를 알고 있었다:
- 장학카드 기능을 SaaS 툴에 내재화해야 한다
- 제휴 카드사의 API를 사용할 수 있다
- 사용자들이 편리하게 카드를 활용할 수 있어야 한다
하지만 현실은 달랐다
- API가 빈약해서 필요한 기능을 직접 조합해야 했다
- 카드사의 일정이 불명확해서 기획이 자주 바뀌었다
- 임시 코드가 쌓이면서 유지보수가 어려워졌다
- 나중에 API가 개선되면 전면 교체가 필요할 것 같았다
이때 우리는 가정하지 않기로 했다. “카드사 API가 안정적일 것이다”, “기획이 크게 바뀌지 않을 것이다”라는 가정은 위험했다. 대신 변화를 전제로 설계하기로 했다.
서버나 앱 개발에서는 이러한 문제를 해결하기 위하여 클린 아키텍처로 외부 의존성을 격리한다. 리액트에서 많이 활용하는 방법은 아니지만 가능하다고 판단했고, 클린 아키텍처를 도입하면 어느정도 개선할 수 있을 것 같았다.
도입 후 카드사가 제대로 된 API를 제공하면, Data 레이어만 수정하면 된다. 여러 API를 조합하던 복잡한 로직이 사라진다.
어떻게 이런 변화가 가능했을까? 먼저 기존 방식의 문제점부터 살펴보자.
기존 방식의 문제점
실무 시나리오로 이해해보자. 백엔드팀이 토스 페이먼츠와 Stripe API를 각각 구축했고, 이제 프론트엔드에서 결제 화면을 만들어야 한다. 두 게이트웨이 모두 지원해야 하는 상황이다.
// ❌ TossConfirmButton.tsx - 토스 페이먼츠 결제 승인
import { useMutation } from "@tanstack/react-query";
import axios from "axios";

export function TossConfirmButton({ order, paymentKey }) {
  const { mutate } = useMutation({
    mutationFn: async () => {
      // ❌ 문제 2: 비즈니스 로직 산재 - 검증 로직이 컴포넌트에 직접 있음
      if (order.totalAmount < 10_000) {
        throw new Error("최소 결제 금액은 10,000원입니다");
      }

      // ❌ 문제 1: API 엔드포인트가 컴포넌트에 박혀있음
      const response = await axios.post("/api/payments/toss/confirm", {
        paymentKey,
        orderId: order.orderId,
        amount: order.totalAmount,
      });

      return response.data; // { paymentKey, status: "DONE", totalAmount, ... }
    },
    onSuccess: (data) => {
      // ❌ 문제 3: 토스 응답 형식에 직접 의존
      alert(
        `결제 완료! 결제 키: ${data.paymentKey}, 금액: ${data.totalAmount}원`
      );
    },
  });

  return <button onClick={() => mutate()}>토스 결제 승인</button>;
}ts
// ❌ StripeConfirmButton.tsx - Stripe 결제 승인
import { useMutation } from "@tanstack/react-query";
import axios from "axios";
export function StripeConfirmButton({ order, paymentIntentId }) {
const { mutate } = useMutation({
mutationFn: async () => {
// ❌ 문제 2: 검증 로직이 중복됨
if (order.totalAmount < 10_000) {
throw new Error("최소 결제 금액은 10,000원입니다");
}
// ❌ 문제 1: Stripe 엔드포인트가 컴포넌트에 박혀있음
const response = await axios.post("/api/payments/stripe/confirm", {
paymentIntentId, // 다른 필드명
orderId: order.orderId,
amount: order.totalAmount,
});
return response.data; // { id, amount, status: "succeeded", ... }
},
onSuccess: (data) => {
// ❌ 문제 3: Stripe 응답 형식에 직접 의존 (필드명이 다름)
alert(`결제 완료! 결제 ID: ${data.id}, 금액: ${data.amount}원`);
},
});
return <button onClick={() => mutate()}>Stripe 결제 승인</button>;
}ts두 컴포넌트는 거의 동일하지만 미묘하게 다르다. API 엔드포인트, 요청 필드명, 응답 필드명이 모두 다르다. 이게 무슨 문제일까?
문제 1: API 엔드포인트 의존성
// ❌ TossConfirmButton.tsx
await axios.post("/api/payments/toss/confirm", { ... });

// ❌ StripeConfirmButton.tsx
await axios.post("/api/payments/stripe/confirm", { ... });ts
각 컴포넌트가 특정 백엔드 API 엔드포인트에 직접 의존한다. 백엔드가 엔드포인트를 변경하면(/api/payments/toss/confirm → /api/v2/toss/payments/confirm) 모든 컴포넌트를 찾아서 수정해야 한다.
문제 2: 비즈니스 로직 산재
// ❌ TossConfirmButton.tsx
if (order.totalAmount < 10_000)
  throw new Error("최소 결제 금액은 10,000원입니다");

// ❌ StripeConfirmButton.tsx
if (order.totalAmount < 10_000)
  throw new Error("최소 결제 금액은 10,000원입니다");ts
검증 로직이 두 컴포넌트에 중복된다. “최소 결제 금액을 15,000원으로 올려주세요” 요청이 들어오면 모든 컴포넌트를 찾아 수정해야 한다.
문제 3: 외부 응답 형식 의존
// ❌ TossConfirmButton.tsx
alert(`결제 키: ${data.paymentKey}, 금액: ${data.totalAmount}원`);

// ❌ StripeConfirmButton.tsx
alert(`결제 ID: ${data.id}, 금액: ${data.amount}원`);ts
토스와 Stripe는 응답 필드명이 다르다 (paymentKey vs id, totalAmount vs amount). 각 컴포넌트가 서로 다른 형식에 의존하기 때문에, 백엔드가 응답 형식을 변경하면 해당 게이트웨이를 사용하는 모든 컴포넌트를 수정해야 한다.
문제 4: 레이어 구분 없음
“훅으로 분리하면 되지 않나?” 맞다. 훅으로 재사용은 해결할 수 있다. 하지만 어디까지 분리해야 할까?
// ❌ 훅으로만 분리하면 여전히 문제
async function confirmTossPayment(order, paymentKey) {
  if (order.totalAmount < MIN_AMOUNT) throw new Error(); // 검증 (Domain)

  const response = await axios.post(
    // API 호출 (Infrastructure)
    "/api/payments/toss/confirm",
    {
      paymentKey, // 토스 형식 (Data)
      orderId: order.orderId,
      amount: order.totalAmount,
    }
  );

  return response.data; // 토스 응답 형식 (Data)
}ts
이 함수는 비즈니스 로직(검증), API 호출(axios), 백엔드 API 형식(/api/payments/toss/confirm, 토스 응답 필드명)이 뒤섞여 있다.
axios→fetch변경 시: 함수 수정 필요- 최소 금액 규칙 변경 시: 함수 수정 필요
- 서버 필드명 변경 시: 함수 수정 필요
- 단위 테스트: API 모킹 없이 검증 로직만 테스트할 수 없음
훅은 로직 재사용만 해결한다. 책임 분리는 해결하지 못한다. 클린 아키텍처는 각 레이어의 변경 이유를 분리한다.

클린 아키텍처란?
클린 아키텍처는 이런 문제를 해결하기 위한 구조다. 핵심은 역할을 분리하는 것이다.
마치 배달 앱을 떠올려보자. 배달 앱에는 다음과 같은 역할이 있다:
- 고객: 음식을 주문한다
- 식당: 음식을 만든다
- 라이더: 음식을 배달한다
- 앱: 주문을 전달하고 상태를 관리한다
각자의 역할이 명확하고, 서로 독립적이다. 라이더가 바뀌어도 식당은 영향을 받지 않는다. 식당의 메뉴가 바뀌어도 라이더는 상관없다.
클린 아키텍처도 마찬가지다. 코드를 3개의 핵심 레이어로 나누고, 각 레이어는 명확한 역할을 가진다.
3개 핵심 레이어 + 보조 구성요소
┌─────────────────────────────────────────────────────────┐
│              Presentation Layer (React)                  │
│  Components, Pages, Hooks, State (Zustand + TanStack)   │
└────────────────────┬────────────────────────────────────┘
                     │ depends on
┌────────────────────▼────────────────────────────────────┐
│           Domain Layer (Business Logic)                  │
│     Use Cases, Entities, Repository Interfaces          │
└────────────────────▲────────────────────────────────────┘
                     │ implements
┌────────────────────┴────────────────────────────────────┐
│              Data Layer (API Access)                     │
│    Repository Impl, DTOs, Mappers, Data Sources         │
└────────────────────┬────────────────────────────────────┘
                     │ uses
┌────────────────────▼────────────────────────────────────┐
│         Infrastructure Layer (External Services)         │
│            HTTP Client (Axios), Storage                  │
└─────────────────────────────────────────────────────────┘

              Core Layer (Cross-cutting Concerns)
          Config, Constants, Utils, Errors, Validators
            ← 모든 레이어에서 참조 가능
3개 핵심 레이어 (Swift, Kotlin, Flutter와 동일):
- Presentation: UI와 상호작용 (Hook, Component)
- Domain: 비즈니스 규칙과 로직 (UI, API 모름)
- Data: 외부 데이터를 가져와서 내부 형식으로 변환
3개 보조 구성요소:
- DI: 의존성 주입 메커니즘 (모든 레이어를 조합)
- Infrastructure: 외부 도구 추상화 (HTTP 클라이언트, 라이브러리)
- Core: 공통 유틸리티 (Constants, Utils, Errors, Validators)
핵심은 Domain이 완전히 독립적이라는 점이다. Domain은 UI가 어떻게 생겼는지, API가 어떤 형식인지 전혀 모른다. 오직 비즈니스 규칙만 담당한다.
의존성 방향
Presentation → Domain ← Data ← Infrastructure
       ↓          ↓        ↓          ↓
                  DI (모든 레이어를 조합)
       ↓          ↓        ↓          ↓
              Core (모든 레이어가 의존 가능)
의존성은 항상 안쪽으로 향한다. Domain은 Core만 의존하고, 나머지 레이어(Data, Infrastructure, Presentation)는 Domain을 의존한다.
DI 레이어는 가장 바깥쪽에 위치하여 모든 레이어의 구체적인 구현체를 조합하고 의존성을 주입한다. Core 레이어는 공통 유틸리티로, 모든 레이어에서 참조 가능하다.
핵심 원칙:
- Domain은 순수하다:
Core를 제외한 어떤 레이어도 import하지 않는다 - Repository Interface는 Domain에:
DataLayer는 Domain의 interface를 구현한다 - 의존성 역전: 고수준(
Domain)이 저수준(Data)에 의존하지 않는다
클린 아키텍처의 창시자 Uncle Bob은 다음과 같은 다이어그램으로 의존성 방향을 설명한다:
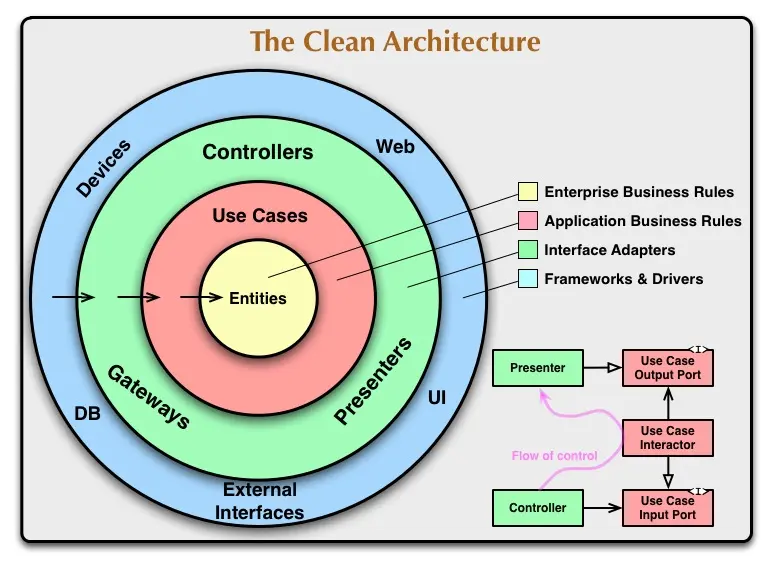
이 다이어그램에서 주목할 점은 모든 화살표가 안쪽을 가리킨다는 것이다. 바깥쪽 레이어(UI, DB, 외부 서비스)는 안쪽을 의존하지만, 안쪽(중심의 Entities/Use Cases)은 바깥을 전혀 모른다. 이것이 바로 의존성 역전 원칙이다.
우리 프로젝트는 이 구조를 React 생태계에 맞게 3개 핵심 레이어로 재구성했다. 하지만 핵심 철학은 동일하다: Domain은 순수하고, 의존성은 항상 안쪽으로 흐른다.
💡 더 자세한 내용은 Uncle Bob의 Clean Architecture 블로그를 참고하자.
이게 왜 중요할까? Domain에 비즈니스 로직을 넣으면, UI가 바뀌든 API가 바뀌든 Domain은 영향을 받지 않는다. 마치 식당이 메뉴를 바꿔도 라이더가 영향을 받지 않는 것처럼.
개념을 이해했으니, 이제 실제 프로젝트에서 어떻게 구현하는지 보자.
폴더 구조
이 글은 간단한 도메인의 서비스 기준으로 작성되었다. 복잡한 도메인 구조는 참고용으로 함께 소개한다.
간단한 도메인의 서비스
src/
├── di/
│   └── DIContainer.ts             # 의존성 주입 컨테이너
│
├── core/
│   ├── constants.ts               # 전역 상수
│   ├── utils/
│   │   └── formatters.ts          # 공통 포맷팅 함수
│   └── validators/
│       └── paymentValidator.ts    # 검증 유틸
│
├── infrastructure/
│   ├── http/
│   │   ├── httpClient.ts          # HTTP 클라이언트 추상화
│   │   └── axiosHttpClient.ts     # Axios 구현체
│   └── external/
│       └── analytics.ts            # 외부 라이브러리
│
├── data/
│   ├── datasources/
│   │   ├── remote/                # 서버 API 호출
│   │   │   ├── tossPaymentsDataSource.ts
│   │   │   └── stripeDataSource.ts
│   │   └── local/                 # 브라우저 저장소 (localStorage, sessionStorage)
│   │       ├── orderCacheDataSource.ts
│   │       ├── settingsDataSource.ts
│   │       └── cartDataSource.ts
│   ├── repositories/
│   │   └── PaymentRepositoryImpl.ts
│   ├── dto/
│   │   ├── tossPaymentDto.ts      # openapi-typescript로 자동 생성
│   │   └── stripePaymentDto.ts    # openapi-typescript로 자동 생성
│   └── mappers/
│       ├── tossPaymentMapper.ts
│       └── stripePaymentMapper.ts
│
├── domain/
│   ├── entities/
│   ├── repositories/
│   └── useCases/
│
└── presentation/
    ├── hooks/
    ├── components/
    └── adapters/
remote/ vs local/ 분리 이유:
- remote/: 서버 API 호출을 담당한다 (
axios,fetch사용) - local/: 브라우저 저장소를 담당한다 (
localStorage,sessionStorage, 메모리 캐시) - 책임이 다르므로 분리하면 변경에 강하다. 예를 들어 API가
REST에서GraphQL로 바뀌어도remote/폴더만 수정하면 된다
장점:
- 한눈에 전체 레이어 구조 파악 가능
- 레이어별 책임이 명확함
- 팀 온보딩이 쉬움 (새로운 개발자가 구조 이해하기 쉬움)
단점:
- 도메인이 많아지면 파일 찾기 어려움
- 한 도메인 수정 시 여러 폴더를 이동해야 함
복잡한 도메인의 서비스
도메인이 많거나 팀 규모가 큰 경우 도메인을 기준으로 폴더를 나눌 수 있다.
apps/web/src/
├── domains/                    # 도메인별 완전 독립
│   ├── auth/                   # 인증 도메인
│   │   ├── di/
│   │   │   └── container.ts
│   │   ├── domain/
│   │   │   ├── entities/
│   │   │   ├── repositories/
│   │   │   └── useCases/
│   │   ├── data/
│   │   │   ├── datasources/
│   │   │   │   ├── remote/
│   │   │   │   │   └── authDataSource.ts
│   │   │   │   └── local/
│   │   │   │       └── tokenDataSource.ts
│   │   │   ├── repositories/
│   │   │   ├── dto/
│   │   │   └── mappers/
│   │   └── presentation/
│   │       ├── hooks/
│   │       └── components/
│   │
│   ├── payment/                # 결제 도메인
│   │   ├── di/
│   │   ├── domain/
│   │   ├── data/
│   │   └── presentation/
│   │
│   ├── user/                   # 사용자 도메인
│   │   ├── di/
│   │   ├── domain/
│   │   ├── data/
│   │   └── presentation/
│   │
│   └── [other-domains]/
│
└── core/                       # 모든 도메인이 공유
    ├── infrastructure/         # HTTP, Storage 추상화
    │   ├── http/
    │   ├── storage/
    │   └── logging/
    ├── shared/                 # 도메인 독립적 공통 코드
    │   ├── constants.ts
    │   ├── utils/
    │   └── validators/
    └── ui/                     # 공통 UI 컴포넌트
        └── components/
            ├── Button.tsx
└── Input.tsx장점:
- 도메인별로 완전히 독립적: 각 도메인이 자신만의 DI, Domain, Data, Presentation을 가짐
- 한 도메인 수정 시 해당 폴더만 열면 됨: 파일 찾기가 훨씬 쉬움
- 팀별로 도메인 담당 가능: 인증팀은
auth/, 결제팀은payment/폴더만 관리
단점:
- 초기 구조 설정이 복잡함
- 도메인이 적으면 오버엔지니어링이 될 수 있음
- 도메인 간 경계 설정이 어려울 수 있음
언제 어떤 구조를 선택할까?
프로젝트의 복잡도와 팀 구성에 따라 선택할 수 있다:
| 상황 | 고려할 수 있는 구조 | 선택 이유 |
| -------------------- | ------------------- | --------------------- |
| 도메인이 적을 때 | 간단한 도메인 구조 | 심플하고 빠른 개발 |
| 도메인이 많을 때 | 복잡한 도메인 구조 | 도메인별 독립성 확보 |
| 소규모 팀 | 간단한 도메인 구조 | 복잡도 낮춤 |
| 팀 규모가 클 때 | 복잡한 도메인 구조 | 팀별 도메인 담당 가능 |
| 단기 프로젝트 | 간단한 도메인 구조 | 빠른 개발 우선 |
프로젝트의 복잡도에 따를 수도 있고, 팀원이 많은 경우 업무의 효율화로 인해 구조를 분리할 수도 있다. 효율적으로 개발할 수 있는 방향성을 선택하는 게 중요하다.
실용적 조언: 처음엔 간단한 구조로 시작하고, 도메인이나 팀이 성장하면 복잡한 구조로 점진적으로 전환할 수 있다.
마치 집을 짓듯이, 처음엔 작은 집(간단한 구조)을 짓고, 가족이 늘어나면(도메인/팀 증가) 증축(복잡한 구조 전환)하는 것이다.
핵심 원칙: 폴더 구조는 팀과 프로젝트를 위한 도구다. 교조적으로 따르지 말고, 상황에 맞게 선택하자. 완벽한 구조는 없고, 프로젝트에 맞는 구조만 있을 뿐이다.
이제 가장 바깥쪽 레이어부터 차례대로 살펴보자.
Core Layer: 공통 기능의 중심
Core 레이어는 조금 특별하다. 모든 레이어에서 참조할 수 있는 공통 기능을 담고 있다. 일반적으로 클린 아키텍처에서는 의존성이 안쪽으로 향하지만, Core는 예외다.
왜 필요할까? 상수, 에러, 유틸리티 함수처럼 모든 레이어에서 사용하는 코드를 매번 각 레이어에 중복해서 만들 필요가 있을까? 그렇지 않다. Core에 한 번만 정의하고 모든 레이어에서 가져다 쓰면 된다.
Constants: 전역 상수
// core/constants.ts
export const MIN_PAYMENT_AMOUNT = 1_000; // 최소 결제 금액
export const MAX_PAYMENT_AMOUNT = 1_000_000; // 최대 결제 금액
export const CURRENCY_UNIT = "원"; // 통화 단위ts
Validators: 검증 로직
// core/validators/paymentValidator.ts
import { MIN_PAYMENT_AMOUNT, MAX_PAYMENT_AMOUNT } from "../constants";

export const validatePaymentAmount = (amount: number): void => {
  if (amount < MIN_PAYMENT_AMOUNT) {
    throw new Error(`최소 결제 금액은 ${MIN_PAYMENT_AMOUNT}원입니다`);
  }
  if (amount > MAX_PAYMENT_AMOUNT) {
    throw new Error(`최대 결제 금액은 ${MAX_PAYMENT_AMOUNT}원입니다`);
  }
};ts
Utils: 공통 유틸리티
// core/utils/formatters.ts
export const formatCurrency = (amount: number): string => {
  return amount.toLocaleString("ko-KR");
};

export const formatPayment = (payment: number): string => {
  return `${formatCurrency(payment)}원`;
};ts
Core 레이어는 순수 함수와 상수만 담는다. 비즈니스 로직이나 외부 의존성을 가지면 안 된다. 그래야 모든 레이어에서 안전하게 사용할 수 있다.
공통 기능을 정의했으니, 이제 외부 세계와의 연결 고리를 살펴보자.
Infrastructure Layer: 외부 세계와의 격리
Infrastructure 레이어는 외부 라이브러리나 HTTP 클라이언트를 추상화한다. 왜 필요할까?
만약 axios를 직접 쓰다가 fetch로 바꾸고 싶다면? 모든 코드를 수정해야 한다. 하지만 추상화해두면 구현체만 바꾸면 된다.
// infrastructure/http/httpClient.ts
export interface HttpClient {
  get<T>(url: string): Promise<T>;
  post<T>(url: string, data: unknown): Promise<T>;
  put<T>(url: string, data: unknown): Promise<T>;
  delete<T>(url: string): Promise<T>;
}ts
이건 인터페이스다. 구현체는 따로 만든다.
// infrastructure/http/axiosHttpClient.ts
import axios from "axios";
import type { HttpClient } from "./httpClient";

export class AxiosHttpClient implements HttpClient {
  async get<T>(url: string): Promise<T> {
    const response = await axios.get(url);
    return response.data;
  }

  async post<T>(url: string, data: unknown): Promise<T> {
    const response = await axios.post(url, data);
    return response.data;
  }

  // put, delete도 유사하게 구현
}ts
이제 axios에서 fetch로 바꾸고 싶으면? 새로운 구현체만 만들면 된다.
// infrastructure/http/fetchHttpClient.ts
import type { HttpClient } from "./httpClient";

export class FetchHttpClient implements HttpClient {
  async get<T>(url: string): Promise<T> {
    const response = await fetch(url);
    return response.json();
  }

  async post<T>(url: string, data: unknown): Promise<T> {
    const response = await fetch(url, {
      method: "POST",
      body: JSON.stringify(data),
      headers: { "Content-Type": "application/json" },
    });
    return response.json();
  }

  // put, delete도 유사하게 구현
}ts
나머지 코드는 HttpClient 인터페이스만 의존하므로 아무 영향을 받지 않는다.
외부 세계를 격리했으니, 이제 들어온 데이터를 우리가 원하는 형식으로 바꿔보자.
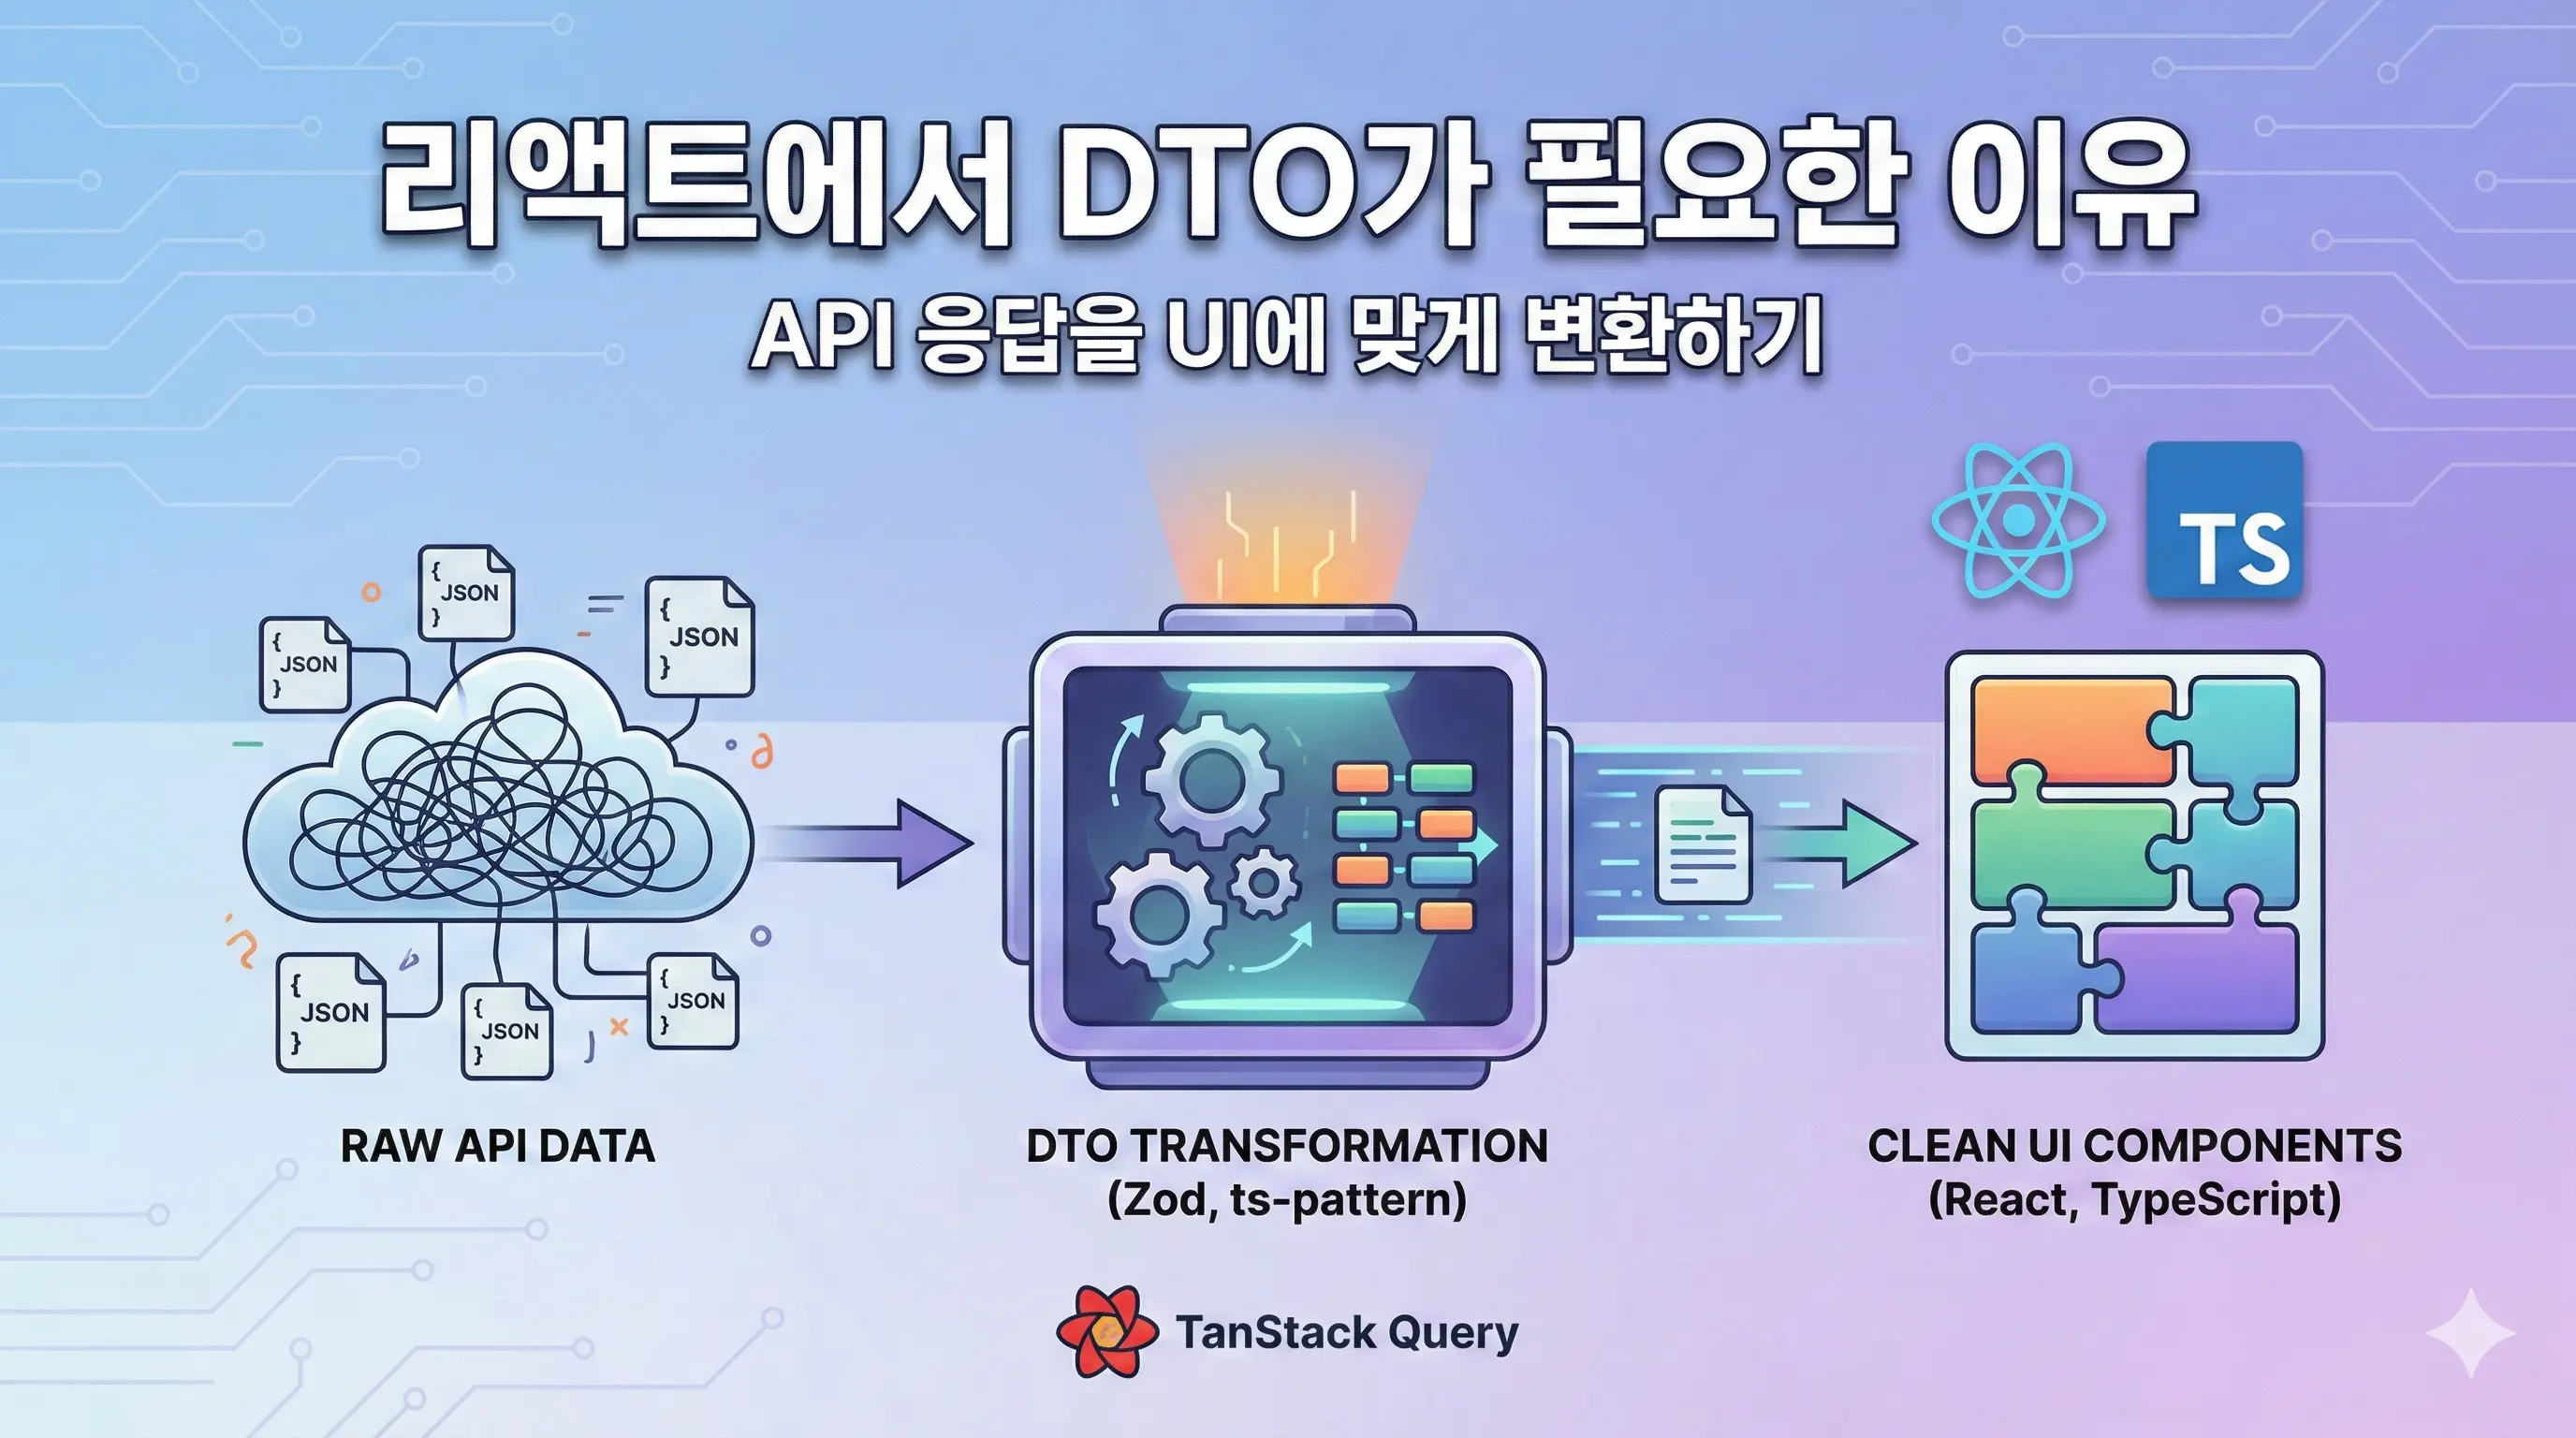
Data Layer: 외부 데이터를 내부 형식으로 변환
Data 레이어는 Domain의 Repository Interface를 구현하고, DTO를 Entity로 변환한다.
중요한 원칙:
- Repository Implementation은 Data에: Domain의 interface를
implements한다 - DTO → Entity 변환은 Data의 책임: Mapper를 통해 변환한다
- Domain과 Infrastructure를 연결: Domain은 “무엇을”, Data는 “어떻게”를 담당한다
Data 레이어는 4가지 역할을 한다:
Repository Impl: Domain의 Repository Interface를 구현한다DataSource: API를 호출하고 DTO를 반환한다DTO(Data Transfer Object): 서버 응답 타입을 정의한다Mapper: DTO를Domain의Entity로 변환한다
Repository: API 호출 로직
// data/repositories/PaymentRepositoryImpl.ts
import type {
  PaymentRepository,
  ConfirmPaymentParams,
} from "@/domain/repositories/PaymentRepository";
import type { IPaymentDataSource } from "@/data/datasources/remote/IPaymentDataSource";
import type { Payment, PaymentGateway } from "@/domain/entities/Payment";
import { mapTossPaymentDtoToDomain } from "@/data/mappers/tossPaymentMapper";
import { mapStripePaymentDtoToDomain } from "@/data/mappers/stripePaymentMapper";

export class PaymentRepositoryImpl implements PaymentRepository {
  constructor(
    private tossDataSource: IPaymentDataSource,
    private stripeDataSource: IPaymentDataSource
  ) {}

  // 게이트웨이별 DataSource와 Mapper를 반환하는 헬퍼 메서드
  private getGatewayContext(gateway: PaymentGateway) {
    switch (gateway) {
      case "toss":
        return {
          dataSource: this.tossDataSource,
          mapper: mapTossPaymentDtoToDomain,
        };
      case "stripe":
        return {
          dataSource: this.stripeDataSource,
          mapper: mapStripePaymentDtoToDomain,
        };
      default:
        throw new Error(`지원하지 않는 결제 게이트웨이입니다: ${gateway}`);
    }
  }

  async confirmPayment(
    params: ConfirmPaymentParams,
    gateway: PaymentGateway
  ): Promise<Payment> {
    // 1. 게이트웨이에 맞는 DataSource와 Mapper 선택
    const { dataSource, mapper } = this.getGatewayContext(gateway);

    // 2. DataSource로 DTO 가져오기
    const paymentDto = await dataSource.confirmPayment(
      params.orderId,
      params.paymentKey,
      params.amount
    );

    // 3. Mapper로 Entity 변환
    return mapper(paymentDto);
  }

  async getPayment(
    paymentId: string,
    gateway: PaymentGateway
  ): Promise<Payment> {
    const { dataSource, mapper } = this.getGatewayContext(gateway);
    const paymentDto = await dataSource.getPayment(paymentId);
    return mapper(paymentDto);
  }

  async cancelPayment(
    paymentId: string,
    gateway: PaymentGateway,
    reason?: string
  ): Promise<Payment> {
    const { dataSource, mapper } = this.getGatewayContext(gateway);
    const paymentDto = await dataSource.cancelPayment(paymentId, reason);
    return mapper(paymentDto);
  }
}ts
중요한 원칙:
- Repository interface는
Domain에, implementation은Data에:Domain은 “어떻게 데이터를 가져올지”는 몰라도 된다 - DTO → Entity 변환은
Repository의 책임:UseCase는Entity만 받는다 - DataSource를 통해 데이터를 가져온다: API 호출은
DataSource가 담당한다
getGatewayContext() 패턴의 장점:
위 코드에서 getGatewayContext() 헬퍼 메서드를 사용한 이유는:
- DRY 원칙 준수: 3개 메서드(
confirmPayment,getPayment,cancelPayment)에서 반복되던 switch-case 로직을 한 곳으로 모았다 - 타입 안정성: 반환 타입이 명확하다 (
{ dataSource: IPaymentDataSource, mapper: Function }) - 유지보수성: 새 게이트웨이(PayPal, Kakao Pay 등) 추가 시
getGatewayContext()한 곳만 수정하면 된다 - 가독성: 각 메서드가 간결해져서 비즈니스 로직에 집중할 수 있다
Repository는 왜 두 가지 책임을 분리하는가?
Repository는 두 가지 책임을 가진다:
- API를 호출해서 DTO를 받는다 (DataSource의 역할)
- DTO를 Entity로 변환한다 (Mapper의 역할)
만약 Repository가 이 두 가지를 모두 하면 어떻게 될까?
// ❌ 나쁜 예시: Repository가 모든 것을 함
class PaymentRepositoryImpl {
  constructor(private httpClient: HttpClient) {}

  async confirmPayment(
    params: ConfirmPaymentParams,
    gateway: PaymentGateway
  ): Promise<Payment> {
    // ❌ API 엔드포인트를 직접 알아야 함
    const endpoint =
      gateway === "toss"
        ? "https://api.tosspayments.com/v1/payments/confirm"
        : "https://api.stripe.com/v1/payment_intents/confirm";

    // ❌ HTTP 호출도 직접
    const dto = await this.httpClient.post(endpoint, params);

    // ❌ 변환도 직접 (상태 매핑, 타입 변환 등)
    return new Payment({
      paymentId: dto.paymentKey || dto.id,
      status: dto.status === "DONE" ? "SUCCEEDED" : "PENDING",
      // ...
    });
  }
}ts
문제점:
Repository가 토스와 Stripe의 API 엔드포인트를 모두 알아야 한다- 새 게이트웨이 추가 시
Repository를 계속 수정해야 한다 (OCP 위반) - 상태 매핑 로직이
Repository에 섞여 있어 재사용이 어렵다 - 테스트 시 HTTP 호출을 모킹해야 한다
따라서 우리는 단일 책임 원칙에 따라 분리한다:
- DataSource: 게이트웨이 API 호출만 담당 (Raw HTTP, 인증 헤더 등)
- Mapper: DTO → Entity 변환만 담당 (상태 매핑, 타입 변환 등)
- Repository: DataSource와 Mapper를 조합해서 Entity를 반환
// ✅ 좋은 예시: 책임 분리
class PaymentRepositoryImpl {
  constructor(
    private tossDataSource: IPaymentDataSource,
    private stripeDataSource: IPaymentDataSource
  ) {} // HttpClient가 아닌 DataSource 주입

  private getGatewayContext(gateway: PaymentGateway) {
    switch (gateway) {
      case "toss":
        return {
          dataSource: this.tossDataSource,
          mapper: mapTossPaymentDtoToDomain,
        };
      case "stripe":
        return {
          dataSource: this.stripeDataSource,
          mapper: mapStripePaymentDtoToDomain,
        };
      default:
        throw new Error(`지원하지 않는 결제 게이트웨이입니다: ${gateway}`);
    }
  }

  async confirmPayment(
    params: ConfirmPaymentParams,
    gateway: PaymentGateway
  ): Promise<Payment> {
    const { dataSource, mapper } = this.getGatewayContext(gateway); // 게이트웨이별 선택

    const dto = await dataSource.confirmPayment(
      params.orderId,
      params.paymentKey,
      params.amount
    ); // DataSource가 HTTP 처리
    return mapper(dto); // Mapper가 변환 처리
  }
}ts
이제 DataSource가 무엇인지 자세히 보자.
DataSource: 네트워크 통신 담당
DataSource는 API 엔드포인트를 호출하고 DTO를 반환하는 역할을 한다.
마치 택배 기사가 물건을 배송만 하고 포장을 뜯지 않는 것처럼, DataSource는 데이터를 가져오기만 하고 변환하지 않는다.
// data/datasources/remote/IPaymentDataSource.ts
import type { TossPaymentDto } from "@/data/dto/tossPaymentDto";
import type { StripePaymentDto } from "@/data/dto/stripePaymentDto";

export interface IPaymentDataSource {
  confirmPayment(
    orderId: string,
    paymentKey: string,
    amount: number
  ): Promise<TossPaymentDto | StripePaymentDto>;
  getPayment(paymentId: string): Promise<TossPaymentDto | StripePaymentDto>;
  cancelPayment(
    paymentId: string,
    reason?: string
  ): Promise<TossPaymentDto | StripePaymentDto>;
}ts
// data/datasources/remote/tossPaymentsDataSource.ts
import type { HttpClient } from "@/infrastructure/http/HttpClient";
import type { TossPaymentDto } from "@/data/dto/tossPaymentDto";
import type { IPaymentDataSource } from "./IPaymentDataSource";
export class TossPaymentsDataSource implements IPaymentDataSource {
constructor(private httpClient: HttpClient) {}
async confirmPayment(
orderId: string,
paymentKey: string,
amount: number
): Promise<TossPaymentDto> {
// 백엔드 API 호출
return this.httpClient.post<TossPaymentDto>("/api/payments/toss/confirm", {
paymentKey,
orderId,
amount,
});
}
async getPayment(paymentKey: string): Promise<TossPaymentDto> {
return this.httpClient.get<TossPaymentDto>(
`/api/payments/toss/${paymentKey}`
);
}
async cancelPayment(
paymentKey: string,
cancelReason?: string
): Promise<TossPaymentDto> {
return this.httpClient.post<TossPaymentDto>(
`/api/payments/toss/${paymentKey}/cancel`,
{
cancelReason,
}
);
}
}tsDataSource는 3가지 원칙을 따른다:
- DTO만 반환한다:
Entity가 아닌DTO를 반환한다. 변환은Mapper의 몫이다. HttpClient인터페이스에 의존한다:axios나fetch를 직접 사용하지 않는다.HttpClient인터페이스를 통해 HTTP 클라이언트를 추상화한다.- 비즈니스 로직을 포함하지 않는다: API 호출만 담당한다.
DataSource와 HttpClient의 관계를 보면, axios인지 fetch인지는 DataSource도 모른다. 이것이 바로 의존성 역전 원칙이다.
결제 게이트웨이가 추가되면?
이제 가장 강력한 장점을 살펴보자. 해외 확장으로 새로운 결제 게이트웨이를 추가하면 어떻게 될까?
한국 시장에서 토스 페이먼츠로 시작했다가, 미국/유럽 진출을 위해 Stripe를 추가한다면?
마치 새로운 배송 파트너가 추가되어도 창고와 재고 시스템은 그대로인 것처럼, 결제 게이트웨이가 추가되어도 비즈니스 로직은 그대로다.
시나리오: 한국(토스) → 해외 확장(Stripe 추가)
기존: 토스 페이먼츠만 지원
이미 위에서 본 TossPaymentsDataSource가 있다.
추가: Stripe DataSource 구현
// data/datasources/remote/stripeDataSource.ts
import type { HttpClient } from "@/infrastructure/http/HttpClient";
import type { StripePaymentDto } from "@/data/dto/stripePaymentDto";
import type { IPaymentDataSource } from "./IPaymentDataSource";

export class StripeDataSource implements IPaymentDataSource {
  constructor(private httpClient: HttpClient) {}

  async confirmPayment(
    orderId: string,
    paymentIntentId: string,
    amount: number
  ): Promise<StripePaymentDto> {
    // 백엔드 API 호출
    return this.httpClient.post<StripePaymentDto>(
      "/api/payments/stripe/confirm",
      {
        paymentIntentId,
        orderId,
        amount,
      }
    );
  }

  async getPayment(paymentIntentId: string): Promise<StripePaymentDto> {
    return this.httpClient.get<StripePaymentDto>(
      `/api/payments/stripe/${paymentIntentId}`
    );
  }

  async cancelPayment(
    paymentIntentId: string,
    cancellationReason?: string
  ): Promise<StripePaymentDto> {
    return this.httpClient.post<StripePaymentDto>(
      `/api/payments/stripe/${paymentIntentId}/cancel`,
      {
        cancellationReason,
      }
    );
  }
}ts
토스와 Stripe는 API 엔드포인트, 인증 방식, 요청/응답 형식이 완전히 다르다. 하지만 둘 다 IPaymentDataSource 인터페이스를 구현하기 때문에 상위 레이어는 차이를 모른다.
추가된 것: 파일 3개
StripeDataSource.ts- Stripe API 호출stripePaymentDto.ts- Stripe 응답 타입 (이미 추가함)stripePaymentMapper.ts- Stripe DTO → Payment Entity 변환 (이미 추가함)
변경되지 않은 것:
PaymentEntity - 그대로OrderEntity - 그대로ConfirmPaymentUseCase- 그대로PaymentRepositoryInterface - 그대로useConfirmPaymentHook - 그대로CheckoutButtonComponent - 그대로
인터페이스만 바라보기 때문에 새로운 결제 게이트웨이 추가가 간편하다. 기존 코드는 전혀 손대지 않고, 새 DataSource와 Mapper만 추가하면 된다.
DTO: 서버 응답 타입
토스 페이먼츠와 Stripe는 응답 형식이 완전히 다르다. 필드명도 다르고, 데이터 타입도 다르다.
// data/dto/tossPaymentDto.ts - 토스 페이먼츠 응답
export interface TossPaymentDto {
  paymentKey: string; // 토스에서 발급한 결제 고유 키
  orderId: string; // 주문 ID
  orderName: string; // 주문명
  status: "READY" | "IN_PROGRESS" | "DONE" | "CANCELED" | "ABORTED"; // 결제 상태
  method: "카드" | "가상계좌" | "간편결제" | "계좌이체"; // 결제 수단
  totalAmount: number; // 총 결제 금액 (원 단위)
  balanceAmount: number; // 취소 가능 금액
  currency: "KRW"; // 통화
  requestedAt: string; // 결제 요청 시각 (ISO 8601)
  approvedAt: string; // 결제 승인 시각 (ISO 8601)
  receipt?: {
    url: string; // 영수증 URL
  };
}

// data/dto/stripePaymentDto.ts - Stripe 응답
export interface StripePaymentDto {
  id: string; // Stripe에서 발급한 결제 ID
  amount: number; // 결제 금액 (센트 단위! 주의)
  currency: string; // 통화 (usd, krw 등)
  status: "requires_payment_method" | "processing" | "succeeded" | "canceled"; // 결제 상태
  payment_method: string | null; // 결제 수단 ID
  metadata: {
    orderId: string; // 주문 ID (메타데이터에 저장)
  };
  created: number; // 생성 시각 (Unix timestamp, 초 단위)
  canceled_at: number | null; // 취소 시각 (Unix timestamp)
  charges?: {
    data: Array<{
      receipt_url: string; // 영수증 URL
    }>;
  };
}ts
주요 차이점:
| 항목 | 토스 페이먼츠 | Stripe |
| ------------- | --------------- | ---------------------- |
| 필드명 스타일 | camelCase | snake_case |
| 결제 ID | paymentKey | id |
| 금액 단위 | 원 (10000) | 센트 (1000 = $10.00) |
| 상태 값 | "DONE" | "succeeded" |
| 시각 형식 | ISO 8601 문자열 | Unix timestamp (숫자) |
| orderId 위치 | 최상위 필드 | metadata 객체 안 |
타입 자동 생성 도구
백엔드가 OpenAPI(Swagger) 스펙을 제공한다면 타입을 자동으로 생성할 수 있다. 토스 페이먼츠와 Stripe 모두 OpenAPI 스펙을 제공한다.
참고: 아래 통계는 2025년 11월 기준이며, 읽는 시점에 따라 주간 다운로드 수나 GitHub Stars가 달라질 수 있다.
- openapi-typescript: 주간 다운로드 1,550,913회. OpenAPI 스펙에서 TypeScript 타입을 생성. 런타임 비용 0, 7.6k GitHub stars
- orval: 주간 다운로드 508,185회. 타입뿐만 아니라 React Query 훅, Mock 데이터까지 한 번에 생성. 4.9k GitHub stars
- zod-to-openapi: 주간 다운로드 994,912회. Zod 스키마에서 OpenAPI 문서를 생성 (역방향). 1.4k GitHub stars
- zodios: 주간 다운로드 342,000~709,000회. Zod 기반 타입 안전 HTTP 클라이언트. 런타임 검증 포함. 1.9k GitHub stars
사용 예시:
openapi-typescript를 사용하면 앞서 정의한 TossPaymentDto, StripePaymentDto와 동일한 타입이 자동으로 생성된다. 생성된 타입은 다음처럼 re-export해서 사용한다.
// data/dto/tossPaymentDto.ts (packages/types에서 re-export)
export type { TossPaymentDto } from "@/packages/types/generated/payment";

// data/dto/stripePaymentDto.ts
export type { StripePaymentDto } from "@/packages/types/generated/payment";ts
실무에서는 두 가지 접근 방식이 가능하다:
-
OpenAPI 스펙이 제공되는 경우: 위 라이브러리들(
openapi-typescript,orval등)을 활용해 스웨거 바탕으로 제너레이팅된 타입을 사용하면 된다. API 스펙 변경 시 타입도 자동으로 동기화되므로 가장 이상적이다. -
OpenAPI 스펙이 없는 경우: 노션 명세, 구글 독스, 슬랙 메시지 등 서버 개발자와 합의한 명세를 바탕으로 DTO를 직접 정의한다. 자동화는 되지 않지만, 명세만 명확하다면 충분히 안전하게 타입을 관리할 수 있다.
// OpenAPI가 없는 환경에서 명세 기반 DTO 정의
// data/dto/paymentDto.ts
export interface PaymentDto {
  paymentKey: string; // 노션 명세 v2.1 참조
  orderId: string;
  totalAmount: number;
  status: "DONE" | "CANCELED";
}ts
중요한 것은 타입 생성 도구가 아니라 명세와의 동기화다. 도구는 그 과정을 자동화할 뿐이다.
런타임 검증: Zod
openapi-typescript로 생성한 타입은 컴파일 타임에만 동작한다. 하지만 실제 API 응답은 런타임에 검증이 필요하다. 백엔드가 잘못된 데이터를 보내거나, API 스펙이 변경되었을 때 런타임 에러를 방지하려면 Zod 같은 런타임 검증 라이브러리를 사용하는 것을 추천한다.
// data/dto/tossPaymentDto.ts
import { z } from "zod";

// Zod 스키마 정의
export const TossPaymentDtoSchema = z.object({
  paymentKey: z.string(),
  orderId: z.string(),
  status: z.enum(["READY", "IN_PROGRESS", "DONE", "CANCELED", "ABORTED"]),
  totalAmount: z.number().positive(),
  approvedAt: z.string().datetime(),
});

// 타입 추론
export type TossPaymentDto = z.infer<typeof TossPaymentDtoSchema>;

// data/datasources/remote/tossPaymentsDataSource.ts
import { TossPaymentDtoSchema } from "@/data/dto/tossPaymentDto";

export class TossPaymentsDataSource implements IPaymentDataSource {
  async confirmPayment(
    orderId: string,
    paymentKey: string,
    amount: number
  ): Promise<TossPaymentDto> {
    const response = await this.httpClient.post("/api/payments/toss/confirm", {
      paymentKey,
      orderId,
      amount,
    });

    // 런타임 검증 - 잘못된 데이터면 즉시 에러 발생
    return TossPaymentDtoSchema.parse(response);
  }
}ts
이렇게 하면 백엔드가 예상치 못한 데이터를 보내도 DataSource 레이어에서 즉시 에러를 잡을 수 있다. 컴파일 타임 타입 안정성과 런타임 검증을 모두 확보할 수 있다.
DTO와 Entity의 차이
서버가 보내는 데이터(DTO)와 우리가 쓰는 데이터(Entity)는 다르다.
DTO (Data Transfer Object):
- 결제 게이트웨이가 정의한 형식 (토스:
camelCase, Stripe:snake_case) - 검증 로직 없음
- 게이트웨이 업데이트에 따라 변경됨
Entity:
- 프론트엔드가 제어하는 통일된 형식 (
camelCase, 타입 안정성) - UI에서 사용하기 편한 구조 (필드명, 메서드)
- 게이트웨이 응답이 바뀌어도 영향받지 않음 (
Mapper가 보호)
마치 택배 상자(DTO)와 상품(Entity)의 관계다. 토스와 Stripe는 서로 다른 포장 방식으로 데이터를 보내지만, Mapper가 “포장을 뜯어서 상품을 꺼내는 역할”을 하기 때문에 우리는 항상 동일한 Payment Entity를 받는다.
토스 페이먼츠에서 갑자기 “API 버전 업데이트로 paymentKey 필드를 payment_id로 변경했습니다”라고 통보하면 어떻게 될까? 기존 방식이라면 해당 필드를 사용하는 모든 컴포넌트를 찾아서 수정해야 한다. 하지만 클린 아키텍처에서는 단 한 곳만 고치면 된다. 바로 TossPaymentMapper다.
Mapper: 서버 변경의 충격을 흡수하는 완충재
Mapper는 서버와 우리 코드 사이의 번역기다. 서버가 payment_gateway_id를 보내든 gateway_id를 보내든, 우리 코드는 전혀 신경 쓰지 않는다. Mapper가 모든 변경을 한 곳에서 처리하기 때문이다.
마치 건물의 면진 구조와 비슷하다. 지진(서버 변경)이 일어나도 건물 내부(Domain, Presentation)는 흔들리지 않는다. 충격 흡수 장치(Mapper)가 모든 충격을 흡수하기 때문이다.
Mapper는 class가 아닌 순수 함수로 구현한다. 상태를 가질 필요가 없고, 단순히 데이터를 변환하는 역할만 하기 때문이다.
// data/mappers/tossPaymentMapper.ts
import { z } from "zod";
import {
  Payment,
  PaymentStatus,
  PaymentMethod,
} from "@/domain/entities/Payment";
import type { TossPaymentDto } from "@/data/dto/tossPaymentDto";

const tossPaymentDtoSchema = z.object({
  paymentKey: z.string(),
  orderId: z.string(),
  orderName: z.string(),
  status: z.enum(["READY", "IN_PROGRESS", "DONE", "CANCELED", "ABORTED"]),
  method: z.enum(["카드", "가상계좌", "간편결제", "계좌이체"]),
  totalAmount: z.number(),
  currency: z.literal("KRW"),
  requestedAt: z.string(),
  approvedAt: z.string().optional(),
  receipt: z.object({ url: z.string() }).optional(),
});

// 토스 상태 → 통합 상태로 매핑
function mapTossStatus(status: TossPaymentDto["status"]): PaymentStatus {
  const statusMap: Record<TossPaymentDto["status"], PaymentStatus> = {
    READY: "PENDING",
    IN_PROGRESS: "PROCESSING",
    DONE: "SUCCEEDED",
    CANCELED: "CANCELED",
    ABORTED: "FAILED",
  };
  return statusMap[status];
}

// 토스 결제수단 → 통합 결제수단으로 매핑
function mapTossMethod(method: TossPaymentDto["method"]): PaymentMethod {
  const methodMap: Record<TossPaymentDto["method"], PaymentMethod> = {
    카드: "CARD",
    가상계좌: "VIRTUAL_ACCOUNT",
    간편결제: "EASY_PAY",
    계좌이체: "TRANSFER",
  };
  return methodMap[method];
}

export function mapTossPaymentDtoToDomain(dto: TossPaymentDto): Payment {
  const validated = tossPaymentDtoSchema.parse(dto);

  return new Payment({
    paymentId: `toss_${validated.paymentKey}`, // 내부 ID 생성
    orderId: validated.orderId,
    gateway: "toss",
    gatewayPaymentId: validated.paymentKey,
    amount: validated.totalAmount, // 원 단위 그대로
    currency: validated.currency,
    status: mapTossStatus(validated.status),
    method: mapTossMethod(validated.method),
    requestedAt: new Date(validated.requestedAt), // ISO 8601 → Date
    approvedAt: validated.approvedAt
      ? new Date(validated.approvedAt)
      : undefined,
    receiptUrl: validated.receipt?.url,
  });
}ts
// data/mappers/stripePaymentMapper.ts
import { z } from "zod";
import { Payment, PaymentStatus } from "@/domain/entities/Payment";
import type { StripePaymentDto } from "@/data/dto/stripePaymentDto";
const stripePaymentDtoSchema = z.object({
id: z.string(),
amount: z.number(),
currency: z.string(),
status: z.enum([
"requires_payment_method",
"processing",
"succeeded",
"canceled",
]),
payment_method: z.string().nullable(),
metadata: z.object({
orderId: z.string(),
}),
created: z.number(),
canceled_at: z.number().nullable(),
charges: z
.object({
data: z.array(z.object({ receipt_url: z.string() })),
})
.optional(),
});
// Stripe 상태 → 통합 상태로 매핑
function mapStripeStatus(status: StripePaymentDto["status"]): PaymentStatus {
const statusMap: Record<StripePaymentDto["status"], PaymentStatus> = {
requires_payment_method: "PENDING",
processing: "PROCESSING",
succeeded: "SUCCEEDED",
canceled: "CANCELED",
};
return statusMap[status];
}
export function mapStripePaymentDtoToDomain(dto: StripePaymentDto): Payment {
const validated = stripePaymentDtoSchema.parse(dto);
return new Payment({
paymentId: `stripe_${validated.id}`, // 내부 ID 생성
orderId: validated.metadata.orderId, // metadata에서 추출
gateway: "stripe",
gatewayPaymentId: validated.id,
amount: validated.amount, // 센트 단위 그대로 (currency로 구분)
currency: validated.currency.toUpperCase(),
status: mapStripeStatus(validated.status),
method: validated.payment_method ? "CARD" : undefined, // Stripe는 카드 결제만 지원
requestedAt: new Date(validated.created * 1000), // Unix timestamp → Date (밀리초 변환)
approvedAt:
validated.status === "succeeded"
? new Date(validated.created * 1000)
: undefined,
canceledAt: validated.canceled_at
? new Date(validated.canceled_at * 1000)
: undefined,
receiptUrl: validated.charges?.data[0]?.receipt_url, // charges 배열에서 추출
});
}tsMapper 함수는 다음을 수행한다:
- 검증:
Zod로 DTO의 형식을 검증한다 - 상태 정규화: 게이트웨이별 상태(
"DONE","succeeded") → 통합 상태("SUCCEEDED")로 변환한다 - 타입 변환: ISO 8601 문자열 / Unix timestamp →
Date객체로 변환한다 - 필드명 매핑: 게이트웨이 필드(
paymentKey,id) → 도메인 필드(gatewayPaymentId)로 변환한다 - 데이터 추출: 중첩된 구조에서 필요한 값 추출 (
metadata.orderId,charges[0].receipt_url) - Entity 생성: 통일된
PaymentEntity를 생성한다
핵심은 이것이다: 토스 페이먼츠가 갑자기 “API v2 업데이트: paymentKey → paymentId로 변경”이라고 공지하면?
// ✅ TossPaymentMapper 한 곳만 수정
export function mapTossPaymentDtoToDomain(dto: TossPaymentDto): Payment {
  return new Payment({
-   gatewayPaymentId: validated.paymentKey,  // 기존
+   gatewayPaymentId: validated.paymentId,   // 변경
    // ...
  });
}ts
또는 Stripe가 상태 값을 변경하면?
// ✅ StripePaymentMapper의 상태 매핑만 수정
function mapStripeStatus(status: StripePaymentDto["status"]): PaymentStatus {
  const statusMap = {
-   succeeded: "SUCCEEDED",        // 기존
+   payment_successful: "SUCCEEDED", // 변경
    // ...
  };
}ts
Mapper 함수 딱 몇 줄만 고치면 된다. Presentation, Domain, UseCase 레이어는 전혀 수정하지 않아도 된다. 도입부에서 언급한 “10개 파일 수정 → 1개 파일 수정”이 바로 이것이다.
데이터를 변환했으니, 이제 이 데이터로 무엇을 할지 정의하는 비즈니스 규칙을 살펴보자.
Domain Layer: 비즈니스 규칙의 중심
Domain 레이어는 클린 아키텍처의 핵심이다. UI도 모르고, API도 모르고, 오직 비즈니스 규칙만 담당한다.
중요한 원칙:
- Domain은 Core만 import한다:
Data,Infrastructure,Presentation레이어는 절대 import하지 않는다 - Repository Interface는 Domain에 정의한다: 구현체(
Impl)는DataLayer에 위치한다
Domain은 3가지로 구성된다:
Entity: 비즈니스 규칙을 담은 객체Repository Interface: 데이터 접근 추상화UseCase: 비즈니스 로직의 흐름
Entity: 비즈니스 규칙
Entity는 비즈니스와 관련된 모든 규칙을 담는다. 결제 시스템에는 Order와 Payment Entity가 있다.
Entity의 책임 범위
Entity를 설명하기 전에, Entity가 무엇을 하고 무엇을 하지 않는지 명확히 해두자.
Entity가 일반적으로 하는 것 (✅):
- 비즈니스 규칙 검증: 최소 금액, 잔액 확인 등
- 도메인 로직 캡슐화:
canProcessPayment(),canRefund()같은 판단 로직 - 불변성 보장:
readonly필드로 잘못된 상태 변경 방지 - 타입 안정성 제공: DTO의 불안정한 타입을 안정적인 타입으로 변환
Entity가 보통 하지 않는 것 (❌):
- 상태 직접 변경: 서버만 상태를 변경하고, Entity는 검증만 담당한다 (백엔드와 다른 점)
- API 호출: 이것은 Repository의 역할이다
- UI 로직: 이것은 Presentation Layer의 역할이다
- 데이터 변환: 이것은 Mapper의 역할이다
- 외부 의존성 참조: axios, TanStack Query, React 같은 라이브러리를 import하지 않는다
핵심: Entity는 "이 데이터가 유효한가?"와 "이 작업이 가능한가?"만 답한다. “어떻게 데이터를 가져올까?”, “어떻게 화면에 보여줄까?”는 다른 레이어의 몫이다.
마치 물건을 사려고 할 때 점원에게 묻는 것과 비슷하다:
- ✅ “이 금액으로 살 수 있나요?” (canPurchase) - Entity의 역할
- ❌ “신용카드 결제는 어떻게 하나요?” (HTTP 호출) - DataSource의 역할
- ❌ “영수증을 예쁘게 출력해주세요” (UI) - Presentation의 역할
물론 프로젝트에 따라 Entity의 책임이 조금씩 다를 수 있다. 하지만 대부분의 경우 위 원칙을 따르면 레이어 간 책임이 명확해진다.
프론트엔드 Entity는 왜 불변인가?
백엔드와 프론트엔드의 Entity는 역할이 다르다.
백엔드 Entity: 상태를 직접 변경하고 DB에 저장한다.
// 백엔드: Entity가 상태를 직접 변경
class Payment {
  private _status: PaymentStatus;

  approve() {
    this._status = "SUCCEEDED"; // ✅ Entity가 상태 변경
    this.save(); // DB에 저장
  }
}ts
프론트엔드 Entity: 서버 응답을 검증하고 UI에 전달한다 (읽기 전용).
// 프론트엔드: Entity는 검증만
class Payment {
  private readonly _status: PaymentStatus;

  canCancel(): boolean {
    return this._status === "PENDING"; // ✅ 검증만
  }
}ts
프론트엔드는 서버가 상태의 주인이다. 클라이언트가 임의로 상태를 변경하면 서버와 불일치가 발생한다.
마치 은행 거래와 같다. 내 화면(프론트엔드)에 “결제 대기”라고 보여도, 은행 서버에서 “결제 완료”라고 하면 은행 서버가 정답이다. 화면의 상태를 임의로 바꿀 수 없는 것처럼, 프론트엔드는 서버 응답만 믿어야 한다.
| 구분 | 백엔드 Entity | 프론트엔드 Entity |
| ------------- | --------------------- | ----------------------- |
| 상태 변경 | ✅ Entity가 직접 변경 | ❌ 서버 응답으로만 변경 |
| 저장소 | DB (영속성) | TanStack Query (캐시) |
| 역할 | 비즈니스 로직 실행 | 검증 + UI 전달 |
| 예시 | payment.approve() | payment.canCancel() |
우리 프로젝트는 서버 상태 관리를 TanStack Query에게 위임했다. 만약 Entity에서도 상태를 관리하면 어떻게 될까?
// ❌ Entity가 상태를 직접 변경하면?
class Payment {
  private _status: PaymentStatus;

  confirm() {
    this._status = "SUCCEEDED"; // Entity가 상태 변경
  }
}

// 문제: TanStack Query 캐시와 Entity 상태가 따로 논다!
// - Entity: _status = "SUCCEEDED"
// - TanStack Query 캐시: status = "PENDING"
// 어느 것이 진짜인가?ts
Entity와 TanStack Query 캐시가 각자 상태를 관리하면 불일치가 발생한다. 따라서 Entity는 readonly로 만들어 검증만 담당하고, 상태는 TanStack Query가 서버 응답으로만 업데이트한다.
이제 실제 Entity 코드를 보자.
Order Entity
Order Entity는 주문 정보와 결제 처리 규칙을 담당한다. 사용자가 장바구니에서 “결제하기”를 누르면 주문이 생성된다.
// domain/entities/Order.ts
export type OrderStatus = "PENDING" | "PAID" | "FAILED" | "CANCELED";

interface OrderItem {
  productId: string;
  productName: string;
  quantity: number;
  price: number;
}

interface OrderProps {
  orderId: string;
  orderName: string; // "아메리카노 외 2건" 같은 주문 요약
  userId: string;
  items: OrderItem[];
  totalAmount: number;
  status: OrderStatus;
  createdAt: Date;
  updatedAt: Date;
}

export class Order {
  private readonly _orderId: string;
  private readonly _orderName: string;
  private readonly _userId: string;
  private readonly _items: readonly OrderItem[];
  private readonly _totalAmount: number;
  private readonly _status: OrderStatus;
  private readonly _createdAt: Date;
  private readonly _updatedAt: Date;

  static readonly MIN_ORDER_AMOUNT = 1_000; // 최소 주문 금액
  static readonly MAX_ORDER_AMOUNT = 10_000_000; // 최대 주문 금액

  constructor(props: OrderProps) {
    this._orderId = props.orderId;
    this._orderName = props.orderName;
    this._userId = props.userId;
    this._items = Object.freeze([...props.items]);
    this._totalAmount = props.totalAmount;
    this._status = props.status;
    this._createdAt = props.createdAt;
    this._updatedAt = props.updatedAt;

    // 생성 시점에 필수 검증 수행
    this.validate();
  }

  private validate(): void {
    if (!this._orderId?.trim()) throw new Error("주문 ID는 필수입니다");
    if (!this._orderName?.trim()) throw new Error("주문명은 필수입니다");
    if (!this._userId?.trim()) throw new Error("사용자 ID는 필수입니다");
    if (this._items.length === 0) throw new Error("주문 상품이 없습니다");
    if (this._totalAmount < 0)
      throw new Error("주문 금액은 음수일 수 없습니다");
  }

  get orderId() {
    return this._orderId;
  }
  get orderName() {
    return this._orderName;
  }
  get userId() {
    return this._userId;
  }
  get items() {
    return this._items;
  }
  get totalAmount() {
    return this._totalAmount;
  }
  get status() {
    return this._status;
  }
  get createdAt() {
    return this._createdAt;
  }
  get updatedAt() {
    return this._updatedAt;
  }

  // 비즈니스 규칙: 주문 금액 검증
  static validateOrderAmount(amount: number): void {
    if (amount < this.MIN_ORDER_AMOUNT) {
      throw new Error(`최소 주문 금액은 ${this.MIN_ORDER_AMOUNT}원입니다`);
    }
    if (amount > this.MAX_ORDER_AMOUNT) {
      throw new Error(`최대 주문 금액은 ${this.MAX_ORDER_AMOUNT}원입니다`);
    }
  }

  // 비즈니스 규칙: 결제 가능 여부 확인
  canProcessPayment(): boolean {
    return this._status === "PENDING" && this._totalAmount > 0;
  }

  // 비즈니스 규칙: 취소 가능 여부 확인
  canCancel(): boolean {
    return this._status === "PENDING" || this._status === "PAID";
  }
}ts
Validation 전략
| 패턴 | 목적 | 호출 시점 |
| ---------------------- | ---------------------------- | ----------------------- |
| private validate() | Entity의 필수 불변 규칙 검증 | Entity 생성 시 자동 |
| static validateXXX() | 사용자 입력 사전 검증 | UseCase에서 명시적 호출 |
| canProcessPayment() | 비즈니스 상태 검증 | UseCase/컴포넌트 호출 |
핵심: Constructor validation은 잘못된 데이터로 Entity가 생성되는 것을 원천 차단한다. Entity를 받는 모든 코드가 “이 객체는 유효하다”고 신뢰할 수 있다.
Entity 메서드 설계 원칙
Domain Entity의 메서드는 비즈니스 규칙 검증에만 집중한다. 모든 검증 메서드는 Boolean을 반환한다.
✅ 좋은 예시 (Boolean 반환):
class Order {
  // 비즈니스 규칙: 결제 가능 여부
  canProcessPayment(): boolean {
    return this._status === "PENDING" && this._totalAmount > 0;
  }

  // 비즈니스 규칙: 취소 가능 여부
  canCancel(): boolean {
    return this._status === "PENDING" || this._status === "PAID";
  }

  // 비즈니스 규칙: 최소 수량 충족 여부
  hasMinimumQuantity(minQty: number): boolean {
    const total = this.items.reduce((sum, item) => sum + item.quantity, 0);
    return total >= minQty;
  }
}ts
❌ 나쁜 예시 (계산/집계):
class Order {
  // ❌ 계산 메서드 - Presentation Layer에서 처리해야 함
  getTotalQuantity(): number {
    return this.items.reduce((sum, item) => sum + item.quantity, 0);
  }

  // ❌ 계산 메서드 - UseCase에서 처리해야 함
  calculateTax(): number {
    return this.totalAmount * 0.1;
  }

  // ❌ 포매팅 메서드 - Presentation Layer에서 처리해야 함
  formatOrderName(): string {
    return `${this.orderName} (${this.items.length}건)`;
  }
}ts이유:
- Entity는 **“이 주문이 유효한가?”**를 판단하는 역할이다
- **“총 수량이 몇 개인가?”**는 Entity의 관심사가 아니다
- 계산이나 집계는 UseCase나 Presentation Layer에서 처리한다
- Entity는 불변이므로 상태를 계산할 필요가 없다 (Tanstack Query가 서버 상태 관리)
주문 상태(OrderStatus) 설명
주문은 PENDING(대기) → PAID(완료) 또는 FAILED(실패)로 전환된다. 결제 전 주문은 PENDING 상태이며, 사용자가 토스 결제 위젯에서 승인하면 PAID로 바뀐다. 결제 실패 시 FAILED, 사용자가 취소하면 CANCELED가 된다.
Payment Entity
결제 처리 내역을 관리하는 Entity이다. 토스 페이먼츠와 Stripe는 API 응답 형식이 다르지만, Payment Entity는 이를 정규화된 형태로 통일한다.
// domain/entities/Payment.ts
export type PaymentGateway = "toss" | "stripe";
export type PaymentStatus =
  | "PENDING"
  | "PROCESSING"
  | "SUCCEEDED"
  | "FAILED"
  | "CANCELED";
export type PaymentMethod =
  | "CARD"
  | "VIRTUAL_ACCOUNT"
  | "EASY_PAY"
  | "TRANSFER";

interface PaymentProps {
  paymentId: string; // 결제 고유 ID
  orderId: string; // 연결된 주문 ID
  gateway: PaymentGateway; // 결제 게이트웨이 (toss 또는 stripe)
  gatewayPaymentId: string; // 게이트웨이에서 발급한 결제 ID (토스의 paymentKey, Stripe의 id)
  amount: number; // 결제 금액 (원 단위로 정규화)
  currency: string; // 통화 (KRW, USD 등)
  status: PaymentStatus; // 결제 상태
  method?: PaymentMethod; // 결제 수단
  requestedAt: Date; // 결제 요청 시각
  approvedAt?: Date; // 결제 승인 시각
  canceledAt?: Date; // 결제 취소 시각
  receiptUrl?: string; // 영수증 URL
}

export class Payment {
  private readonly _paymentId: string;
  private readonly _orderId: string;
  private readonly _gateway: PaymentGateway;
  private readonly _gatewayPaymentId: string;
  private readonly _amount: number;
  private readonly _currency: string;
  private readonly _status: PaymentStatus;
  private readonly _method?: PaymentMethod;
  private readonly _requestedAt: Date;
  private readonly _approvedAt?: Date;
  private readonly _canceledAt?: Date;
  private readonly _receiptUrl?: string;

  constructor(props: PaymentProps) {
    this._paymentId = props.paymentId;
    this._orderId = props.orderId;
    this._gateway = props.gateway;
    this._gatewayPaymentId = props.gatewayPaymentId;
    this._amount = props.amount;
    this._currency = props.currency;
    this._status = props.status;
    this._method = props.method;
    this._requestedAt = props.requestedAt;
    this._approvedAt = props.approvedAt;
    this._canceledAt = props.canceledAt;
    this._receiptUrl = props.receiptUrl;

    this.validate();
  }

  private validate(): void {
    if (!this._paymentId?.trim()) throw new Error("결제 ID는 필수입니다");
    if (!this._orderId?.trim()) throw new Error("주문 ID는 필수입니다");
    if (this._amount < 0) throw new Error("결제 금액은 음수일 수 없습니다");
  }

  get paymentId() {
    return this._paymentId;
  }
  get orderId() {
    return this._orderId;
  }
  get gateway() {
    return this._gateway;
  }
  get gatewayPaymentId() {
    return this._gatewayPaymentId;
  }
  get amount() {
    return this._amount;
  }
  get currency() {
    return this._currency;
  }
  get status() {
    return this._status;
  }
  get method() {
    return this._method;
  }
  get requestedAt() {
    return this._requestedAt;
  }
  get approvedAt() {
    return this._approvedAt;
  }
  get canceledAt() {
    return this._canceledAt;
  }
  get receiptUrl() {
    return this._receiptUrl;
  }

  // 비즈니스 규칙: 결제 성공 여부
  isSucceeded(): boolean {
    return this._status === "SUCCEEDED";
  }

  // 비즈니스 규칙: 결제 취소 가능 여부
  canCancel(): boolean {
    return this._status === "SUCCEEDED" || this._status === "PENDING";
  }

  // 비즈니스 규칙: 결제 재시도 가능 여부
  canRetry(): boolean {
    return this._status === "FAILED";
  }
}ts
Entity들은 다음과 같은 비즈니스 규칙(검증 로직)을 담는다:
Order Entity:
- 최소/최대 주문 금액: 1,000원 이상, 10,000,000원 이하인지 검증
- 결제 가능 여부: 주문 상태가
PENDING이고 금액이 양수인지 확인 (canProcessPayment) - 취소 가능 여부: 주문 상태가
PENDING또는PAID인지 확인 (canCancel) - 주문 상품 검증: 최소 1개 이상의 상품이 있는지 확인
Payment Entity:
- 결제 성공 여부: 상태가
SUCCEEDED인지 확인 (isSucceeded) - 취소 가능 여부: 상태가
SUCCEEDED또는PENDING인지 확인 (canCancel) - 재시도 가능 여부: 상태가
FAILED인지 확인 (canRetry) - 게이트웨이 독립성: 토스와 Stripe의 차이를
PaymentEntity가 숨긴다 (정규화)
기획자가 “최소 주문 금액을 2,000원으로 바꿔주세요”라고 하면? MIN_ORDER_AMOUNT 한 줄만 바꾸면 된다.
// domain/entities/Order.ts
- static readonly MIN_ORDER_AMOUNT = 1_000;
+ static readonly MIN_ORDER_AMOUNT = 2_000;diff
컴포넌트는 건드릴 필요가 없다.
Repository Interface: 데이터 접근 추상화
Domain Layer는 데이터가 어디서 오는지 모른다. HTTP API인지, localStorage인지, sessionStorage인지 알 필요가 없다. 단지 “어떤 데이터가 필요한지”만 정의한다.
이것이 바로 Repository Interface다. Domain은 인터페이스만 정의하고, Data Layer가 실제 구현을 제공한다.
// domain/repositories/PaymentRepository.ts
import type { Payment } from "@/domain/entities/Payment";
import type { PaymentGateway } from "@/domain/entities/Payment";

export interface ConfirmPaymentParams {
  orderId: string;
  paymentKey: string; // 토스 결제 승인용
  amount: number;
}

export interface PaymentRepository {
  confirmPayment(
    params: ConfirmPaymentParams,
    gateway: PaymentGateway
  ): Promise<Payment>;
  getPayment(paymentId: string, gateway: PaymentGateway): Promise<Payment>;
  cancelPayment(
    paymentId: string,
    gateway: PaymentGateway,
    reason?: string
  ): Promise<Payment>;
}ts
핵심은 반환 타입이다. Repository Interface는 DTO가 아닌 Entity를 반환한다. Domain은 DTO의 존재조차 모른다.
이렇게 하면:
Domain은Data를 몰라도 된다: 의존성 역전 원칙- 테스트가 쉬워진다: Mock Repository를 주입하면 끝
- 데이터 소스 교체가 자유롭다: HTTP → LocalStorage로 바꿔도
Domain은 모른다
마치 콘센트와 플러그의 관계다. 콘센트(Interface)는 규격만 정의하고, 어떤 전기(데이터)가 들어오든 상관없다.
UseCase: 비즈니스 로직의 흐름
UseCase는 여러 Entity를 조합해서 비즈니스 로직을 수행한다.
// domain/useCases/confirmPayment.ts
import { Order } from "@/domain/entities/Order";
import { Payment, PaymentGateway } from "@/domain/entities/Payment";
import type {
  PaymentRepository,
  ConfirmPaymentParams,
} from "@/domain/repositories/PaymentRepository";

export class ConfirmPaymentUseCase {
  constructor(private paymentRepository: PaymentRepository) {}

  async execute(
    order: Order,
    params: ConfirmPaymentParams,
    gateway: PaymentGateway
  ): Promise<Payment> {
    // 1. 입력값 검증
    Order.validateOrderAmount(params.amount);

    if (!order.canProcessPayment()) {
      throw new Error("결제할 수 없는 주문 상태입니다");
    }

    if (order.totalAmount !== params.amount) {
      throw new Error("주문 금액과 결제 금액이 일치하지 않습니다");
    }

    // 2. Repository 호출 (게이트웨이에 결제 승인 요청)
    const payment = await this.paymentRepository.confirmPayment(
      params,
      gateway
    );

    // 3. 결제 성공 확인
    if (!payment.isSucceeded()) {
      throw new Error("결제 승인에 실패했습니다");
    }

    return payment;
  }
}tsConfirmPaymentUseCase는 다음을 수행한다:
- 입력값 검증:
OrderEntity의 규칙을 사용해 주문 금액 검증과 결제 가능 여부를 확인한다 - 금액 일치 확인: 주문 금액과 실제 결제 금액이 동일한지 검증한다 (보안)
- Repository 호출:
paymentRepository.confirmPayment()로 결제 게이트웨이에 승인 요청을 보내고,PaymentEntity를 반환받는다
중요한 원칙:
Entity는 불변이다: Tanstack Query가 서버 상태를 관리하므로, Entity는 검증만 담당 (상태 중복 방지)UseCase는Entity만 받는다:DTO를 볼 일이 없다- 게이트웨이는
PaymentRepository가 결정한다: UseCase는 토스인지 Stripe인지 모른다
UseCase는 어떤 UI를 쓰는지, 어떤 HTTP 클라이언트를 쓰는지, 어떤 결제 게이트웨이를 쓰는지 전혀 모른다. 오직 비즈니스 로직만 담당한다.
결제 취소 UseCase 예시
결제된 건을 취소하는 로직도 UseCase로 만들 수 있다.
// domain/useCases/cancelPayment.ts
import { Payment, PaymentGateway } from "@/domain/entities/Payment";
import type { PaymentRepository } from "@/domain/repositories/PaymentRepository";

export class CancelPaymentUseCase {
  constructor(private paymentRepository: PaymentRepository) {}

  async execute(
    payment: Payment,
    gateway: PaymentGateway,
    cancelReason?: string
  ): Promise<Payment> {
    // 1. 취소 가능 여부 검증
    if (!payment.canCancel()) {
      throw new Error("취소할 수 없는 결제 상태입니다");
    }

    // 2. Repository 호출 (게이트웨이에 취소 요청)
    const canceledPayment = await this.paymentRepository.cancelPayment(
      payment.paymentId,
      gateway,
      cancelReason
    );

    // 3. 취소 성공 확인
    if (canceledPayment.status !== "CANCELED") {
      throw new Error("결제 취소에 실패했습니다");
    }

    return canceledPayment;
  }
}ts
결제 취소 로직도 비즈니스 규칙(취소 가능 여부)과 데이터 처리(게이트웨이 요청)를 분리했다. 취소 사유는 선택 사항으로 주입받아 유연하게 처리할 수 있다.
DI Layer: DI Container로 의존성 관리
지금까지 Entity, Repository, UseCase를 만들었다. 하지만 이 모든 의존성을 어떻게 관리할까?
UseCase는 Repository가 필요하고, Repository는 DataSource가 필요하고, DataSource는 HttpClient가 필요하다. 매번 수동으로 생성하면 코드가 복잡해진다.
이때 DI Container를 사용한다. DI Container는 의존성을 한 곳에서 관리하고, 필요할 때 주입해준다.
마치 공장에서 제품을 만들 때 필요한 부품을 미리 준비해두는 것과 같다.
// di/DIContainer.ts
import { AxiosHttpClient } from "@/infrastructure/http/AxiosHttpClient";
import { TossPaymentsDataSource } from "@/data/datasources/remote/tossPaymentsDataSource";
import { StripeDataSource } from "@/data/datasources/remote/stripeDataSource";
import { PaymentRepositoryImpl } from "@/data/repositories/PaymentRepositoryImpl";
import { ConfirmPaymentUseCase } from "@/domain/useCases/confirmPayment";
import { CancelPaymentUseCase } from "@/domain/useCases/cancelPayment";
import type { PaymentRepository } from "@/domain/repositories/PaymentRepository";
import type { HttpClient } from "@/infrastructure/http/HttpClient";

class DIContainer {
  private static _httpClient: HttpClient;
  private static _tossDataSource: TossPaymentsDataSource;
  private static _stripeDataSource: StripeDataSource;
  private static _paymentRepository: PaymentRepository;

  static get httpClient() {
    return (this._httpClient ??= new AxiosHttpClient({
      timeout: 10_000,
    }));
  }

  static get tossDataSource() {
    return (this._tossDataSource ??= new TossPaymentsDataSource(
      this.httpClient
    ));
  }

  static get stripeDataSource() {
    return (this._stripeDataSource ??= new StripeDataSource(this.httpClient));
  }

  static get paymentRepository() {
    return (this._paymentRepository ??= new PaymentRepositoryImpl(
      this.tossDataSource,
      this.stripeDataSource
    ));
  }

  // UseCases (매번 새로 생성)
  static get confirmPaymentUseCase() {
    return new ConfirmPaymentUseCase(this.paymentRepository);
  }

  static get cancelPaymentUseCase() {
    return new CancelPaymentUseCase(this.paymentRepository);
  }

  // 테스트용
  static setMockRepositories(paymentRepo: PaymentRepository) {
    this._paymentRepository = paymentRepo;
  }
}

export default DIContainer;ts전략: HttpClient, DataSource, Repository는 싱글톤 (??=), UseCase는 매번 새로 생성, 테스트 시 Mock 주입 가능.
왜 싱글톤인가? 메모리 낭비 방지
DI Container 없이 매번 인스턴스를 생성하면 어떻게 될까?
// ❌ 안티패턴: 컴포넌트마다 인스턴스 생성
function useConfirmPayment() {
  const httpClient = new AxiosHttpClient({ ... });  // 인스턴스 1
  const tossDataSource = new TossPaymentsDataSource(httpClient);
  const stripeDataSource = new StripeDataSource(httpClient);
  const repository = new PaymentRepositoryImpl(tossDataSource, stripeDataSource);
  const useCase = new ConfirmPaymentUseCase(repository);
  // ...
}

function useCancelPayment() {
  const httpClient = new AxiosHttpClient({ ... });  // 인스턴스 2 (중복!)
  const tossDataSource = new TossPaymentsDataSource(httpClient);  // 중복!
  const stripeDataSource = new StripeDataSource(httpClient);  // 중복!
  const repository = new PaymentRepositoryImpl(tossDataSource, stripeDataSource);
  const useCase = new CancelPaymentUseCase(repository);
  // ...
}

// 문제: HttpClient, DataSource가 Hook마다 생성됨
// - 10개 Hook → HttpClient 10개, TossDataSource 10개, StripeDataSource 10개ts
DI Container는 ??= (Nullish coalescing assignment)로 싱글톤을 구현한다:
// ✅ DI Container: 싱글톤으로 1번만 생성
static get httpClient() {
  return (this._httpClient ??= new AxiosHttpClient({ ... }));
  // _httpClient가 없으면 생성, 있으면 기존 것 재사용
}ts이점:
- 메모리 효율:
HttpClient1개만 생성, 모든 곳에서 재사용 - 설정 일관성:
baseURL,timeout등 설정이 항상 동일 - 성능: 인스턴스 생성 비용 절감
마치 사무실에서 복사기 1대를 여러 사람이 공유하는 것과 같다. 각자 복사기를 사는 것보다 훨씬 효율적이다.
DI 컨테이너 라이브러리 고려하기
위에서 본 수동 DI Container는 프로젝트가 작을 때는 잘 동작한다. 하지만 점차 파일들이 많아질수록 관리해야 할 의존성이 상당히 많아진다. 코드의 복잡도가 깊어지는 것이다.
그럼 더 편하게 관리할 수는 없을까?
마치 공장에서 부품 창고를 자동화하는 것처럼, 의존성 관리를 자동화하는 도구를 도입할 수 있다. 이때 의존성 관리 컨테이너 도구를 팀 내 협의를 통해 도입할 수 있는 방향도 있다.
TypeScript에서 Elixir(혹은 Nest/Spring) 같은 DI 컨테이너를 쓰고 싶으면, 보통 아래 네 개가 제일 자주 거론된다:
참고: 아래 통계는 2025년 11월 기준이며, 읽는 시점에 따라 주간 다운로드 수나 GitHub Stars가 달라질 수 있다.
- InversifyJS: 주간 다운로드 1,577,520회. 강력하고 가벼운
IoC컨테이너. 데코레이터 기반, 11.9k GitHub stars - TSyringe: 주간 다운로드 1,071,444회. Microsoft 제작 경량
DI컨테이너. 데코레이터 기반, 5.8k GitHub stars - TypeDI: 주간 다운로드 330,893회. 간단하면서도 강력한
DI도구. 데코레이터 기반, 4.2k GitHub stars - Awilix: 주간 다운로드 173,441회.
Proxy기반IoC컨테이너. 데코레이터 불필요, 3.7k GitHub stars
패키지의 크기, 성능, 서버사이드 지원 여부 등 다양한 선택지를 고려해서 선택하는 게 좋다. 이 글에서는 Awilix를 예시로 설명하겠다.
Awilix의 장점:
Proxy기반으로 자동 의존성 해결- 데코레이터 필요 없음 (
InversifyJS,TSyringe,TypeDI는 필요) - 간단한 API
- 서버사이드(Node.js)에 최적화
Before: 수동 DI Container
// di/DIContainer.ts
class DIContainer {
  private static _httpClient: HttpClient;
  private static _tossDataSource: TossPaymentsDataSource;
  private static _stripeDataSource: StripeDataSource;
  private static _paymentRepository: PaymentRepository;

  static get httpClient() {
    return (this._httpClient ??= new AxiosHttpClient({
      baseURL: import.meta.env.VITE_API_URL,
      timeout: 10_000,
    }));
  }

  static get tossDataSource() {
    return (this._tossDataSource ??= new TossPaymentsDataSource(
      this.httpClient
    ));
  }

  static get stripeDataSource() {
    return (this._stripeDataSource ??= new StripeDataSource(this.httpClient));
  }

  static get paymentRepository() {
    return (this._paymentRepository ??= new PaymentRepositoryImpl(
      this.tossDataSource,
      this.stripeDataSource
    ));
  }

  // 모든 의존성을 수동으로 작성해야 함...
}ts
After: Awilix 사용
// di/container.ts
import { createContainer, asClass } from "awilix";
import { AxiosHttpClient } from "@/infrastructure/http/axiosHttpClient";
import { TossPaymentsDataSource } from "@/data/datasources/remote/tossPaymentsDataSource";
import { StripeDataSource } from "@/data/datasources/remote/stripeDataSource";
import { PaymentRepositoryImpl } from "@/data/repositories/PaymentRepositoryImpl";
import { ConfirmPaymentUseCase } from "@/domain/useCases/confirmPayment";
import { CancelPaymentUseCase } from "@/domain/useCases/cancelPayment";

const container = createContainer();

container.register({
  // Infrastructure
  httpClient: asClass(AxiosHttpClient).singleton(),

  // DataSources
  tossDataSource: asClass(TossPaymentsDataSource).singleton(),
  stripeDataSource: asClass(StripeDataSource).singleton(),

  // Repositories
  paymentRepository: asClass(PaymentRepositoryImpl).singleton(),

  // UseCases (매번 새로 생성)
  confirmPaymentUseCase: asClass(ConfirmPaymentUseCase).scoped(),
  cancelPaymentUseCase: asClass(CancelPaymentUseCase).scoped(),
});

export default container;ts
// 사용: presentation/hooks/useConfirmPayment.ts
import container from "@/di/container";
export function useConfirmPayment() {
return useMutation<Payment, Error, ConfirmPaymentParams>({
mutationFn: async ({ order, paymentKey, gateway }) => {
// Awilix가 자동으로 의존성 주입
const confirmPaymentUseCase = container.resolve("confirmPaymentUseCase");
return await confirmPaymentUseCase.execute(
order,
{ orderId: order.orderId, paymentKey, amount: order.totalAmount },
gateway
);
},
});
}ts차이점:
- 수동 DI: 모든 의존성을 getter로 일일이 작성해야 함
- Awilix:
register로 한 번만 등록하면 자동으로 의존성 해결
하지만 DI 컨테이너 라이브러리가 필수는 아니다. 프로젝트 규모가 작거나 팀이 익숙하지 않다면 수동 DI Container로도 충분하다. 필요성을 느낄 때 도입하는 것을 추천한다.
모든 레이어의 준비가 끝났다. 이제 사용자와 직접 만나는 UI 레이어를 살펴보자.
Presentation Layer: UI와 상호작용
Presentation 레이어는 사용자와 직접 상호작용한다. 2가지로 구성된다:
Hook:Domain의UseCase를 호출Component: UI를 렌더링
Hook: UseCase 호출
// presentation/hooks/useConfirmPayment.ts
import { useMutation } from "@tanstack/react-query";
import DIContainer from "@/di/DIContainer";
import type { Order } from "@/domain/entities/Order";
import type { Payment, PaymentGateway } from "@/domain/entities/Payment";

interface ConfirmPaymentParams {
  order: Order;
  paymentKey: string;
  gateway: PaymentGateway;
}

export function useConfirmPayment() {
  return useMutation<Payment, Error, ConfirmPaymentParams>({
    mutationFn: async ({ order, paymentKey, gateway }) => {
      // DI Container에서 UseCase를 가져온다
      const confirmPaymentUseCase = DIContainer.confirmPaymentUseCase;

      return await confirmPaymentUseCase.execute(
        order,
        {
          orderId: order.orderId,
          paymentKey,
          amount: order.totalAmount,
        },
        gateway
      );
    },
  });
}ts
useConfirmPayment Hook은 DI Container에서 UseCase를 가져온다. 의존성을 외부에서 주입받는 것이 아니라, 중앙 집중식으로 관리한다.
Component: UI 렌더링
// presentation/components/CheckoutButton.tsx
import { useConfirmPayment } from "@/presentation/hooks/useConfirmPayment";
import type { Order } from "@/domain/entities/Order";
import type { PaymentGateway } from "@/domain/entities/Payment";

interface CheckoutButtonProps {
  order: Order;
  paymentKey: string;
  gateway: PaymentGateway;
}

export function CheckoutButton({
  order,
  paymentKey,
  gateway,
}: CheckoutButtonProps) {
  const { mutate, isPending, error } = useConfirmPayment();

  const handleConfirm = () => {
    mutate(
      { order, paymentKey, gateway },
      {
        onSuccess: (payment) => {
          alert(`결제 승인 완료! 주문번호: ${payment.orderId}`);
        },
      }
    );
  };

  return (
    <div>
      <button
        onClick={handleConfirm}
        disabled={isPending || !order.canProcessPayment()}
      >
        {isPending
          ? "결제 승인 중..."
          : `${gateway === "toss" ? "토스" : "Stripe"} 결제 승인`}
      </button>
      {error && <p style={{ color: "red" }}>{error.message}</p>}
    </div>
  );
}ts
CheckoutButton 컴포넌트는 UI만 담당한다. 비즈니스 로직(order.canProcessPayment())은 Entity가 제공하고, 결제 승인 로직은 UseCase에 위임하며, UseCase는 DI Container가 제공한다.
의존성 주입
“어? UseCase를 어디서 가져왔지?”
앞에서 만든 DI Container에서 가져온다! Hook에서 DIContainer.confirmPaymentUseCase를 호출하면, 모든 의존성이 자동으로 주입된 UseCase를 받을 수 있다.
의존성 체인:
CheckoutButton (Component)
  → useConfirmPayment (Hook)
    → DIContainer.confirmPaymentUseCase (DI Container)
      → ConfirmPaymentUseCase (UseCase)
        → PaymentRepository (Repository)
          → TossDataSource / StripeDataSource (DataSource)
            → HttpClient (Infrastructure)
컴포넌트는 토스인지 Stripe인지만 선택하고, 나머지는 DI Container가 알아서 처리한다.
왜 DI Container가 중요할까?
컴포넌트 내부에서 직접 생성하면 테스트가 매우 어렵다. 테스트하려면 실제 HttpClient를 모킹하거나, 테스트용 서버를 띄워야 한다.
// ❌ 나쁜 예시: 컴포넌트 내부에서 생성
function ConfirmButton({ order, paymentKey, gateway }: Props) {
  // 컴포넌트 안에서 직접 생성
  const httpClient = new AxiosHttpClient();
  const tossDataSource = new TossPaymentsDataSource(httpClient);
  const stripeDataSource = new StripeDataSource(httpClient);
  const paymentRepo = new PaymentRepositoryImpl(
    tossDataSource,
    stripeDataSource
  );
  const useCase = new ConfirmPaymentUseCase(paymentRepo);

  const handleConfirm = async () => {
    await useCase.execute(
      order,
      { orderId: order.orderId, paymentKey, amount: order.totalAmount },
      gateway
    );
  };
  // ...
}

// 문제점:
// 1. 실제 토스/Stripe API를 호출함 (테스트가 느리고 불안정)
// 2. Mock으로 바꿀 방법이 없음
// 3. 네트워크 없으면 테스트 실패ts
DI Container를 사용하면 중앙 집중식으로 의존성을 관리하고, 테스트 시 Mock으로 교체할 수 있다.
테스트에서 Mock 주입
// ConfirmButton.test.tsx
import { test, expect, vi, beforeEach, afterEach } from "vitest";
import { render, fireEvent, screen } from "@testing-library/react";
import { ConfirmButton } from "./ConfirmButton";
import DIContainer from "@/di/DIContainer";
import type { PaymentRepository } from "@/domain/repositories/PaymentRepository";
import { Payment } from "@/domain/entities/Payment";
import { Order } from "@/domain/entities/Order";

// Mock Repository 생성
const mockPaymentRepository: PaymentRepository = {
  confirmPayment: vi.fn().mockResolvedValue(
    new Payment({
      paymentId: "toss_test123",
      orderId: "order_456",
      gateway: "toss",
      gatewayPaymentId: "test123",
      amount: 15_000,
      currency: "KRW",
      status: "SUCCEEDED",
      method: "CARD",
      requestedAt: new Date("2025-01-08T10:00:00"),
      approvedAt: new Date("2025-01-08T10:01:00"),
    })
  ),
  getPayment: vi.fn(),
  cancelPayment: vi.fn(),
};

beforeEach(() => {
  // 테스트 전에 Mock Repository 주입
  DIContainer.setMockRepositories(mockPaymentRepository);
});

afterEach(() => {
  // 테스트 후 DI Container 초기화
  DIContainer.reset();
  vi.clearAllMocks();
});

test("결제 승인 버튼 클릭 시 UseCase 호출", async () => {
  const order = new Order({
    orderId: "order_456",
    orderName: "테스트 상품",
    totalAmount: 15_000,
    status: "PENDING",
    createdAt: new Date(),
  });

  render(
    <ConfirmButton order={order} paymentKey="test_key_123" gateway="toss" />
  );

  fireEvent.click(screen.getByText("토스 결제 승인"));

  // Mock Repository가 올바르게 호출되었는지 검증
  await vi.waitFor(() => {
    expect(mockPaymentRepository.confirmPayment).toHaveBeenCalledWith(
      { orderId: "order_456", paymentKey: "test_key_123", amount: 15_000 },
      "toss"
    );
  });
});ts
DI Container 덕분에 실제 API를 호출하지 않고도 컴포넌트를 테스트할 수 있다. setMockRepositories로 Mock을 주입하고, reset()으로 초기화하면 된다.
Adapter: Entity를 UI에 맞게 가공 (선택)
대부분의 경우 Entity를 그대로 컴포넌트에서 사용하면 된다. 하지만 복잡한 UI 로직이나 여러 Entity를 조합해야 할 때는 Adapter를 사용한다.
Adapter는 Entity를 UI에 최적화된 형태로 변환한다. 마치 콘센트 어댑터처럼, Entity(220V)를 UI(110V)에 맞게 변환하는 역할이다.
Adapter는 Mapper와 마찬가지로 class가 아닌 순수 함수로 구현한다.
공통 유틸 함수: formatters.ts
여러 Adapter에서 반복 사용되는 포맷팅 로직은 공통 유틸 함수로 분리한다.
// presentation/utils/formatters.ts
import type { PaymentStatus } from "@/domain/entities/Payment";

type SupportedCurrency = "KRW" | "USD";

// 통화별 포맷터 (싱글톤 패턴)
const CURRENCY_FORMATTERS: Record<SupportedCurrency, Intl.NumberFormat> = {
  KRW: new Intl.NumberFormat("ko-KR", {
    style: "currency",
    currency: "KRW",
    maximumFractionDigits: 0,
  }),
  USD: new Intl.NumberFormat("en-US", {
    style: "currency",
    currency: "USD",
    minimumFractionDigits: 2,
    maximumFractionDigits: 2,
  }),
};

// Stripe minor unit(센트) → major unit(달러) 변환 기준
const MINOR_UNIT_DIVISOR: Partial<Record<SupportedCurrency, number>> = {
  USD: 100, // Stripe는 센트 단위
  // KRW는 이미 원 단위이므로 1
};

/**
 * 금액을 통화 형식으로 포맷팅
 * - KRW: 원 단위 값
 * - USD: 센트(Stripe minor unit) 단위 값
 *
 * @example formatCurrency(10000, "KRW") // "₩10,000"
 * @example formatCurrency(9999, "USD") // "$99.99"
 */
export function formatCurrency(
  amount: number,
  currency: SupportedCurrency
): string {
  const divisor = MINOR_UNIT_DIVISOR[currency] ?? 1;
  const majorUnitAmount = amount / divisor;

  const formatter = CURRENCY_FORMATTERS[currency];
  if (formatter) {
    return formatter.format(majorUnitAmount);
  }

  // 지원하지 않는 통화 방어 코드
  return `${majorUnitAmount.toLocaleString()} ${currency}`;
}

// 결제 상태 레이블 (상수 객체)
const PAYMENT_STATUS_LABEL: Record<PaymentStatus, string> = {
  PENDING: "결제 대기",
  PROCESSING: "결제 진행 중",
  SUCCEEDED: "결제 완료",
  FAILED: "결제 실패",
  CANCELED: "결제 취소",
} as const;

/**
 * 결제 상태를 한글로 변환
 * @example formatPaymentStatus("SUCCEEDED") // "결제 완료"
 */
export function formatPaymentStatus(status: PaymentStatus): string {
  return PAYMENT_STATUS_LABEL[status] ?? status;
}

/**
 * 날짜를 YYYY-MM-DD 형식으로 포맷팅
 * @example formatDate(new Date("2025-01-08")) // "2025-01-08"
 */
export function formatDate(date: Date): string {
  const year = date.getFullYear();
  const month = String(date.getMonth() + 1).padStart(2, "0");
  const day = String(date.getDate()).padStart(2, "0");

  return `${year}-${month}-${day}`;
}

/**
 * 날짜시간을 YYYY-MM-DD HH:mm 형식으로 포맷팅
 * @example formatDateTime(new Date("2025-01-08T15:30:00")) // "2025-01-08 15:30"
 */
export function formatDateTime(date: Date): string {
  const datePart = formatDate(date);
  const hours = String(date.getHours()).padStart(2, "0");
  const minutes = String(date.getMinutes()).padStart(2, "0");

  return `${datePart} ${hours}:${minutes}`;
}ts
언제 Adapter를 쓸까?
다음과 같은 경우에만 Adapter를 사용한다:
- 여러 Entity를 조합해야 할 때 (Order + Payment)
- 복잡한 UI 변환이 필요할 때 (10000 → “₩10,000”, “SUCCEEDED” → “결제 완료”)
- Entity를 순수하게 유지하고 싶을 때 (UI 로직을 Entity에 넣지 않기)
Adapter의 3가지 핵심 장점
1. UI 로직 격리
Entity는 비즈니스 규칙만 담당하고, UI 표현 로직은 Adapter가 담당한다.
// ❌ Entity에 UI 로직을 넣으면?
class Payment {
  getDisplayAmount(): string {
    return this.currency === "KRW"
      ? `₩${this.amount.toLocaleString()}`
      : `$${(this.amount / 100).toFixed(2)}`; // UI 로직이 Entity에!
  }

  getDisplayStatus(): string {
    const statusMap = { SUCCEEDED: "결제 완료", FAILED: "결제 실패" };
    return statusMap[this.status]; // UI 로직이 Entity에!
  }
}

// ✅ Adapter 함수로 분리
export function adaptPaymentForView(payment: Payment) {
  return {
    displayAmount: formatCurrency(payment.amount, payment.currency), // UI 로직은 Adapter에
    displayStatus: formatPaymentStatus(payment.status),
    displayGateway: payment.gateway === "toss" ? "토스페이먼츠" : "Stripe",
  };
}ts
이렇게 분리하면 여러 컴포넌트에서 동일한 Adapter 함수를 재사용할 수 있다.
2. Entity 순수성 유지
Entity는 UI를 전혀 모른다. 덕분에 서버와 프론트엔드에서 동일한 Entity를 사용할 수 있다.
// domain/entities/Order.ts (프론트엔드 - 불변 패턴)
export class Order {
  private readonly _orderId: string; // 불변
  private readonly _totalAmount: number; // 불변
  private readonly _status: OrderStatus; // 불변

  // ✅ 비즈니스 규칙만 담당 (검증 로직)
  canProcessPayment(): boolean {
    return this._status === "PENDING" && this._totalAmount > 0;
  }

  canCancelOrder(): boolean {
    return this._status === "PENDING" || this._status === "PAID";
  }

  // ❌ 상태 변경 메서드는 없음 (서버가 상태 변경)
  // confirmOrder() 같은 메서드 없음
}ts
3. 테스트 용이성
Adapter는 순수 함수라서 테스트가 쉽다. 같은 입력을 넣으면 항상 같은 결과가 나오고, 외부 상태를 변경하지 않기 때문이다.
import { test, expect } from "vitest";
import { adaptPaymentForView } from "@/presentation/adapters/paymentAdapter";

test("paymentAdapter는 결제 금액과 상태를 포맷팅한다", () => {
  const payment = new Payment({
    paymentId: "toss_test123",
    orderId: "order_456",
    gateway: "toss",
    gatewayPaymentId: "test123",
    amount: 15_000,
    currency: "KRW",
    status: "SUCCEEDED",
    method: "CARD",
    requestedAt: new Date("2025-01-08T10:00:00"),
    approvedAt: new Date("2025-01-08T10:01:00"),
  });

  const view = adaptPaymentForView(payment);

  expect(view.displayAmount).toBe("₩15,000");
  expect(view.displayStatus).toBe("결제 완료");
  expect(view.displayGateway).toBe("토스페이먼츠");
});ts
예시 1: 복잡한 UI 변환 - paymentAdapter
결제 정보를 UI에 맞게 가공하는 Adapter 함수를 만들어보자. Order와 Payment를 조합해서 결제 상세 화면에 필요한 정보를 만든다.
// presentation/adapters/paymentAdapter.ts
import type { Order } from "@/domain/entities/Order";
import type { Payment } from "@/domain/entities/Payment";
import {
  formatCurrency,
  formatPaymentStatus,
  formatDateTime,
} from "@/presentation/utils/formatters";

interface PaymentDetailView {
  // 결제 정보
  paymentId: string;
  displayAmount: string; // "₩15,000" 또는 "$99.99"
  displayStatus: string; // "결제 완료"
  displayGateway: string; // "토스페이먼츠" 또는 "Stripe"
  displayMethod: string; // "카드 결제"

  // 주문 정보
  orderId: string;
  orderName: string;

  // 날짜 정보
  requestedAt: string; // "2025-01-08 10:00"
  approvedAt: string | null; // "2025-01-08 10:01" 또는 null

  // 액션 가능 여부
  canCancel: boolean;
  canRefund: boolean;

  // 영수증
  receiptUrl: string | null;
}

export function adaptPaymentDetailForView(
  order: Order,
  payment: Payment
): PaymentDetailView {
  return {
    paymentId: payment.paymentId,
    displayAmount: formatCurrency(payment.amount, payment.currency),
    displayStatus: formatPaymentStatus(payment.status),
    displayGateway: payment.gateway === "toss" ? "토스페이먼츠" : "Stripe",
    displayMethod: getMethodLabel(payment.method),

    orderId: order.orderId,
    orderName: order.orderName,

    requestedAt: formatDateTime(payment.requestedAt),
    approvedAt: payment.approvedAt ? formatDateTime(payment.approvedAt) : null,

    canCancel: payment.canCancel(),
    canRefund: payment.canRefund(),

    receiptUrl: payment.receiptUrl ?? null,
  };
}

function getMethodLabel(method?: string): string {
  if (!method) return "미지정";
  const methodMap: Record<string, string> = {
    CARD: "카드 결제",
    VIRTUAL_ACCOUNT: "가상계좌",
    EASY_PAY: "간편결제",
    TRANSFER: "계좌이체",
  };
  return methodMap[method] ?? method;
}ts
컴포넌트에서 사용하기
컴포넌트는 Adapter로 변환된 데이터를 사용한다.
// presentation/components/PaymentDetailCard.tsx
export function PaymentDetailCard({ order, payment }: Props) {
  const view = adaptPaymentDetailForView(order, payment);

  return (
    <div className="payment-detail">
      <h3>{view.orderName}</h3>
      <div className="payment-info">
        <p className="amount">{view.displayAmount}</p>
        <p className="status">{view.displayStatus}</p>
        <p className="gateway">{view.displayGateway}</p>
        <p className="method">{view.displayMethod}</p>
      </div>
      <div className="dates">
        <p>요청: {view.requestedAt}</p>
        {view.approvedAt && <p>승인: {view.approvedAt}</p>}
      </div>
      <div className="actions">
        {view.canCancel && <button>결제 취소</button>}
        {view.canRefund && <button>환불 요청</button>}
        {view.receiptUrl && <a href={view.receiptUrl}>영수증 보기</a>}
      </div>
    </div>
  );
}ts
Adapter를 쓰지 않는 경우
단순한 경우에는 Entity를 그대로 쓴다.
// presentation/components/SimpleCancelButton.tsx
import type { Payment } from "@/domain/entities/Payment";

interface Props {
  payment: Payment;
}

export function SimpleCancelButton({ payment }: Props) {
  // Adapter 없이 Entity 직접 사용 (간단할 때)
  return (
    <button disabled={!payment.canCancel()}>
      {payment.status === "PENDING" ? "결제 취소" : "취소 불가"}
    </button>
  );
}ts
전체 결제 승인 Flow: 모든 레이어 통과하기
이제 사용자가 “토스 결제 승인” 버튼을 클릭했을 때 모든 레이어를 어떻게 통과하는지 살펴보자.
1. 사용자가 버튼 클릭
// Presentation Layer: Component
<button onClick={handleConfirm}>토스 결제 승인</button>ts
2. Hook이 UseCase 호출
// Presentation Layer: Hook
const payment = await confirmPaymentUseCase.execute(
  order,
  {
    orderId: order.orderId,
    paymentKey,
    amount: order.totalAmount,
  },
  "toss"
);ts
3. UseCase가 비즈니스 로직 실행
// Domain Layer: UseCase
order.canProcessPayment(); // 주문 상태 검증
const payment = await this.paymentRepository.confirmPayment(params, gateway); // Repository 호출
return payment;ts
4. Repository가 DataSource 선택 및 호출
// Data Layer: Repository
// 1. 게이트웨이에 맞는 DataSource와 Mapper 선택
const { dataSource, mapper } = this.getGatewayContext(gateway);

// 2. DataSource로 DTO 가져오기
const paymentDto = await dataSource.confirmPayment(
  params.orderId,
  params.paymentKey,
  params.amount
);

// 3. Mapper로 Entity 변환
return mapper(paymentDto);ts
5. DataSource가 백엔드 API 호출
// Data Layer: DataSource (Toss)
return this.httpClient.post<TossPaymentDto>("/api/payments/toss/confirm", {
  paymentKey,
  orderId,
  amount,
});ts참고: 백엔드는 실제 토스 페이먼츠 API를 호출한다:
// Backend API가 토스 페이먼츠 API 호출
const tossResponse = await axios.post(
  "https://api.tosspayments.com/v1/payments/confirm",
  { paymentKey, orderId, amount },
  {
    headers: {
      Authorization: `Basic ${Buffer.from(
        `${process.env.TOSS_SECRET_KEY}:`
      ).toString("base64")}`,
    },
  }
);ts
6. HTTP Client가 실제 요청
// Infrastructure Layer: HTTP Client
const response = await axios.post(url, data);
return response.data; // TossPaymentDtots
7. 응답이 다시 역순으로 돌아옴
Infrastructure → Data (DataSource) → Data (Mapper) → Data (Repository) → Domain (Entity) → Presentation// Data Layer: Mapper 함수
const payment = mapTossPaymentDtoToDomain(tossPaymentDto);ts8. Entity가 컴포넌트로 전달
// Presentation Layer: Component
alert(`결제 승인 완료! 주문번호: ${payment.orderId}`);ts
전체 Flow 요약
👤 사용자 버튼 클릭 (토스 결제 승인)
  ↓
🎨 Presentation: Hook → UseCase 호출
  ↓
🧠 Domain: UseCase → 비즈니스 로직 (주문 검증)
  ↓
🧠 Domain: UseCase → Repository 호출 (gateway = "toss")
  ↓
📦 Data: Repository → 게이트웨이별 DataSource 선택 (TossDataSource)
  ↓
📦 Data: DataSource → HTTP Client 호출 (백엔드 API /api/payments/toss/confirm)
  ↓
🌐 Infrastructure: HTTP Client → 백엔드 API 요청
  ↓
🔧 Backend: 토스 페이먼츠 API 호출 (https://api.tosspayments.com/v1/payments/confirm)
  ↓
🔧 Backend: 응답 받고 정규화 → TossPaymentDto 반환
  ↓
🌐 Infrastructure: 응답 받음 (TossPaymentDto)
  ↓
📦 Data: Mapper 함수 → DTO를 Payment Entity로 변환
  ↓
🧠 Domain: Payment Entity 반환
  ↓
🎨 Presentation: UI 업데이트 (성공 메시지)
유지보수가 쉬운 이유: 실무 시나리오
클린 아키텍처의 진짜 강점은 변경에 강하다는 점이다. 실무에서 자주 발생하는 상황을 통해 확인해보자.
시나리오 1: 기획자 - “결제 완료 후 토스트 메시지를 보여주세요”
상황: 사용자가 결제 완료를 명확히 인지할 수 있도록 토스트 메시지를 추가해달라는 요청이 들어왔다.
클린 아키텍처 없을 때:
모든 결제 컴포넌트를 찾아 토스트 로직을 추가해야 한다.
// ❌ CheckoutButton.tsx, QuickPayButton.tsx, OrderDetailButton.tsx 등 10개 파일 수정
const handleConfirm = async () => {
  const response = await axios.post("/api/payments/confirm", {});

  if (response.data.status === "DONE") {
    +toast.success("결제가 완료되었습니다!");
    router.push(`/orders/${orderId}`);
  }
};ts
클린 아키텍처 있을 때:
Hook 1개만 수정하면 모든 컴포넌트에 자동 반영된다.
// ✅ presentation/hooks/useConfirmPayment.ts (1개 파일만 수정)
  export function useConfirmPayment() {
    return useMutation({
      mutationFn: async ({ order, paymentKey, gateway }) => {
        return await DIContainer.confirmPaymentUseCase.execute(
          order,
          { paymentKey, orderId: order.orderId, amount: order.amount },
          gateway
        );
      },
      onSuccess: (payment) => {
+       toast.success("결제가 완료되었습니다!");
        queryClient.invalidateQueries({ queryKey: ["orders"] });
        router.push(`/orders/${payment.orderId}`);
      },
    });
  }diff
변경 범위: 1개 파일, 1줄 → 모든 결제 버튼에 자동 적용
시나리오 2: 백엔드 - “API 응답 필드명이 바뀌었어요”
상황: 백엔드 팀이 API를 리팩토링하면서 응답 필드명을 변경했다.
// 백엔드 API 응답 구조 변경
{
-  "transaction_id": "txn_123",
+  "id": "txn_123",
   "amount": 10000,
   ...
}diff
클린 아키텍처 없을 때:
모든 컴포넌트에서 response.data.transaction_id를 찾아 수정해야 한다.
// ❌ 15개 파일에서 response.data.transaction_id를 찾아 수정
const paymentId = response.data.transaction_id; // 여기를 모두 찾아야 함ts
클린 아키텍처 있을 때:
Mapper 1개만 수정하면 Domain Layer 이상은 영향받지 않는다.
// ✅ data/mappers/paymentMapper.ts (1개 파일만 수정)
  export function mapPaymentDtoToDomain(dto: PaymentDto): Payment {
    return new Payment({
-     paymentId: dto.transaction_id,
+     paymentId: dto.id,
      amount: dto.amount,
      // ...
    });
  }diff
변경 범위: 1개 파일, 1줄 → Domain, UseCase, Hook, 컴포넌트는 Payment Entity만 사용하므로 영향 없음
시나리오 3: CFO - “환불 최소 금액을 10,000원으로 올려주세요”
상황: 수수료 최적화를 위해 환불 최소 금액을 상향 조정하기로 결정했다.
클린 아키텍처 없을 때:
컴포넌트마다 하드코딩된 값을 찾아 수정해야 한다.
// ❌ 여러 컴포넌트에 흩어진 하드코딩
if (refundAmount < 5_000) {
  alert("최소 환불 금액은 5,000원입니다");
}

// RefundModal.tsx, OrderDetail.tsx, PaymentHistory.tsx 등에서 동일한 검증 로직 반복ts
클린 아키텍처 있을 때:
Entity의 상수 1곳만 수정하면 모든 곳에 자동 반영된다.
// ✅ domain/entities/Payment.ts (1개 파일만 수정)
  export class Payment {
-   static readonly MIN_REFUND_AMOUNT = 5_000;
+   static readonly MIN_REFUND_AMOUNT = 10_000;

    canRefund(amount: number): boolean {
      return amount >= Payment.MIN_REFUND_AMOUNT;
    }
  }diff
변경 범위: 1개 파일, 1줄 → 모든 UseCase, Hook, 컴포넌트에 자동 반영
비즈니스 규칙이 단일 진실 공급원(Single Source of Truth)으로 관리된다.
시나리오 4: 신규 개발자 - “테스트 코드를 작성하고 싶어요”
상황: 신규 입사한 주니어 개발자가 결제 로직 테스트를 작성하려고 한다.
클린 아키텍처 없을 때:
컴포넌트 렌더링, Mock Router, Mock Toast 등 복잡한 설정이 필요하다.
// ❌ 컴포넌트 테스트는 설정이 복잡함 (30줄 이상의 Mock 설정)
import { render, screen, fireEvent } from "@testing-library/react";

test("결제 버튼 클릭 시 결제 승인 호출", async () => {
  // Mock Router, Toast, Axios, QueryClient 등 복잡한 설정
  const mockPush = vi.fn();
  vi.mock("next/navigation", () => ({ useRouter: () => ({ push: mockPush }) }));
  // ...
});ts
클린 아키텍처 있을 때:
순수 함수만 테스트하면 되므로 간단하다.
// ✅ 순수 함수 테스트는 간단함
import { mapPaymentDtoToDomain } from "@/data/mappers/paymentMapper";

test("DTO를 Domain Entity로 변환", () => {
  const dto: PaymentDto = {
    id: "txn_123",
    amount: 10_000,
    status: "DONE",
  };

  const payment = mapPaymentDtoToDomain(dto);

  expect(payment.paymentId).toBe("txn_123");
  expect(payment.isSucceeded()).toBe(true);
});ts
// ✅ UseCase 테스트도 간단함
test("최소 결제 금액 미만이면 에러", async () => {
const useCase = new ConfirmPaymentUseCase(mockRepository);
await expect(useCase.execute(order, { amount: 500 }, "toss")).rejects.toThrow(
"최소 결제 금액은 1,000원입니다"
);
});ts변경 범위: 테스트만 추가 (기존 코드 수정 불필요)
결과: 신규 개발자가 첫 주에 30개의 테스트를 작성했다. 비즈니스 로직의 안정성이 보장되어 리팩토링에 대한 두려움이 사라졌다.
시나리오 5: PO - “입금 기능을 추가해주세요”
상황: 결제뿐만 아니라 계좌 입금 기능도 필요하다는 요구사항이 들어왔다.
클린 아키텍처 없을 때:
결제 컴포넌트를 복사해서 수정하다 보면 코드 중복이 발생한다.
// ❌ CheckoutButton.tsx를 복사해서 DepositButton.tsx 생성
// 200줄짜리 컴포넌트를 통째로 복사하고 일부만 수정
// → 버그 수정 시 두 곳 모두 수정해야 함ts
클린 아키텍처 있을 때:
새로운 UseCase만 추가하고, 기존 Repository를 재사용한다.
// ✅ 새로운 UseCase만 추가
// domain/useCases/DepositUseCase.ts
export class DepositUseCase {
  constructor(
    private depositRepository: IDepositRepository,
    private paymentRepository: IPaymentRepository // 기존 Repository 재사용
  ) {}

  async execute(account: Account, amount: number): Promise<Deposit> {
    // 비즈니스 검증
    if (amount < Account.MIN_DEPOSIT_AMOUNT) {
      throw new Error(`최소 입금 금액은 ${Account.MIN_DEPOSIT_AMOUNT}원입니다`);
    }

    // 입금 처리
    const deposit = await this.depositRepository.create(account, amount);

    // 결제 이력 기록 (기존 Repository 재사용)
    await this.paymentRepository.createTransaction({
      type: "DEPOSIT",
      amount: deposit.amount,
    });

    return deposit;
  }
}ts
// ✅ Hook 추가
export function useDeposit() {
return useMutation({
mutationFn: async ({ account, amount }) => {
return await DIContainer.depositUseCase.execute(account, amount);
},
onSuccess: () => {
toast.success("입금이 완료되었습니다!");
},
});
}ts변경 범위: 새로운 UseCase, Hook 추가 → 기존 코드 수정 불필요
기존 검증 로직(MIN_DEPOSIT_AMOUNT), 에러 처리, 토스트 메시지 등의 패턴을 그대로 재사용할 수 있다.
시나리오 6: 동시성 이슈 - “결제 상태가 불일치해요”
상황: 서버에서 결제 상태가 변경되었는데, 클라이언트에서 이전 객체를 수정해서 발생한 버그.
클린 아키텍처 없을 때:
컴포넌트에서 객체를 직접 수정(mutation)하면 예상치 못한 부작용이 발생한다.
// ❌ 컴포넌트에서 객체 직접 수정
const payment = { id: "txn_123", status: "PENDING" };

// 나중에 다른 곳에서
payment.status = "DONE"; // mutation 발생
// → 서버 상태와 불일치, 여러 곳에서 동일 객체 참조 시 버그ts
클린 아키텍처 있을 때:
Entity의 모든 속성을 readonly로 선언하여 불변성을 보장하고, 검증 메서드만 제공한다.
// ✅ Entity는 readonly로 불변성 보장 + 검증 메서드만 제공
export class Payment {
  readonly paymentId: string;
  readonly status: "PENDING" | "DONE" | "CANCELED" | "FAILED";
  readonly amount: number;

  static readonly MIN_AMOUNT = 1_000;

  constructor(props: Payment) {
    Object.assign(this, props);
  }

  // ✅ 검증 메서드만 제공 (boolean 반환)
  isSucceeded(): boolean {
    return this.status === "DONE";
  }

  canCancel(): boolean {
    return this.status === "PENDING" || this.status === "DONE";
  }

  isPayable(): boolean {
    return this.status === "PENDING" && this.amount >= Payment.MIN_AMOUNT;
  }
}ts
// ✅ 사용 예시
const payment = new Payment({
id: "txn_123",
status: "PENDING",
amount: 10_000,
});
payment.status = "DONE"; // ❌ TypeScript 컴파일 에러 (readonly)
// ✅ 검증 메서드 사용
if (payment.canCancel()) {
// 상태 변경은 서버에서 처리 (UseCase를 통해)
await cancelPaymentUseCase.execute(payment.paymentId);
}ts변경 범위: Entity 설계 원칙 적용 → 컴파일 타임에 불변성 보장
핵심: 프론트엔드 Entity는 검증 메서드만 제공한다. 상태 변경은 서버가 담당하고, 프론트엔드는 UseCase를 통해 서버에 요청한 후 새로운 상태를 받아온다.
도입 후 기대 효과
우리 팀은 기존 Feature Based Architecture에서 Domain Based Clean Architecture로 전환했다.
팀원들에게 위에서 설명한 장점들을 정리해서 전달했다: “서버 필드명이 바뀌어도 Mapper 1줄만 고치면 된다”, “비즈니스 로직이 Entity에 모여 있어 테스트가 쉽다”, “레이어가 명확해 AI가 정확한 위치에 코드를 생성한다”.
특히 우리 서비스는 Next.js 기반이라 서버 환경과 클라이언트 환경을 모두 고려해야 했는데, 레이어가 명확할수록 개선과 리팩토링이 훨씬 수월했다.
사실 제일 걱정했던 부분은 내가 이 아키텍처 변경을 주도한 만큼, 기존 코드베이스 전체를 전환해야 한다는 책임감이었다. 하지만 AI Prompt를 활용해 전환했더니 생각 이상으로 빠르게 성공했다.
처음엔 팀원들도 “조금 과한 설계 아닌가?” 싶어했지만, 변경이 잦은 우리 서비스 환경(금융사 정책 변경, API 응답 형식 변경)을 고려하면 왜 이 구조가 필요한지 설명했더니 이해하기 시작했다.
코드 리뷰가 오히려 더 쉬워질 것이다
파일 개수는 2~3배 늘어나지만, 레이어가 명확하기 때문에 필요한 부분만 선택적으로 볼 수 있다. 비즈니스 로직 변경이라면 Domain/Entity만 보면 되고, API 변경이라면 Data/DataSource만 보면 된다.
특히 테스트 코드 위주로 리뷰하는 것이 가능해진다. 구조가 테스트하기 좋게 설계되어 있다 보니, 팀원들이 테스트 코드를 더 많이 작성하게 되었다. 리뷰어는 테스트 코드를 먼저 보고 “이 케이스도 추가하면 좋겠어요”, “이 엣지 케이스는 어떻게 처리하나요?” 같은 본질적인 질문을 할 수 있다. 코드 품질이 자연스럽게 높아질 것으로 기대한다.
AI가 정확한 위치에 코드를 생성한다
아키텍처 구조를 프롬프트에 명확히 작성해두면, AI가 정확히 어느 레이어에 어떤 코드를 작성해야 하는지 이해한다. 다음은 실제로 사용하는 AI 프롬프트 예시다:
# CLEAN ARCHITECTURE RULES

## DI Layer (Dependency Injection)
- MUST: Use singleton pattern (??= operator) for all instances
- MUST: Provide factory methods (static getters) for dependencies
- MUST NOT: Contain any business logic
- MUST NOT: Directly instantiate dependencies outside of getters

## Core Layer (Shared Utilities)
- MUST: Be pure, reusable utility functions
- MUST: Have zero dependencies on other layers
- MUST NOT: Import from Domain, Data, Infrastructure, or Presentation
- MUST NOT: Contain framework-specific code

## Infrastructure Layer (External Adapters)
- MUST: Implement port interfaces defined in Domain
- MUST: Handle all external system communication (HTTP, Storage, etc.)
- MUST NOT: Know about Domain entities or business rules
- MUST NOT: Transform data formats (use Data layer Mappers instead)

## Data Layer (Data Access & Transformation)
- MUST: Implement Repository interfaces from Domain
- MUST: Use Mapper to convert DTO ↔ Entity
- MUST: Handle all DTO type definitions
- MUST NOT: Contain validation or business logic
- MUST NOT: Skip Mapper and directly pass DTO to Domain

## Domain Layer (Business Logic)
- MUST: Contain all business rules and validation in Entities
- MUST: Define Repository interfaces (ports)
- MUST: Be completely independent (no imports from other layers)
- MUST NOT: Call APIs or access external systems directly
- MUST NOT: Import from Data, Infrastructure, or Presentation layers

## Presentation Layer (UI & Hooks)
- MUST: Use hooks to consume UseCases
- MUST: Handle UI state and user interactions only
- MUST NOT: Contain business logic or validation
- MUST NOT: Call Repository or DataSource directly
- MUST NOT: Import DTOs (only work with Entities)

---

Example Task:
"Add minimum payment amount validation logic"

Expected AI Response:
- File: `src/Domain/Entity/Order.ts`
- Action: Add validation method to Entity class
- Reason: Business rule MUST be in Domain Layer

Example Task:
"Server changed response format: paymentKey → payment_id"

Expected AI Response:
- File: `src/Data/Mapper/TossPaymentMapper.ts`
- Action: Update single line in Mapper
- Reason: DTO transformation MUST happen only in Mapper
폴더 구조가 명확하지 않으면 AI가 어디에 코드를 넣을지 헤매지만, 이렇게 레이어별 MUST/MUST NOT 규칙을 명시하면 AI가 개발자가 의도한 대로, 정해진 틀 내에서 기능을 추가하고 테스트 코드를 작성할 수 있다. 아키텍처 가이드라인을 벗어나지 않으면서도 빠르게 개발할 수 있는 것이다.
장기적으로 기대하는 효과
- 심리적 안정감: “이거 고치면 어디 터질까” 불안감 소멸. 변경 범위가 명확하므로 배포가 두렵지 않음
- 온보딩 시간 단축: 새 팀원이 구조만 이해하면 바로 기여 가능. “이 기능은 어디 있나요?” 질문이 줄어들 것
- 테스트 커버리지 증가:
UseCase는 모킹 없이 테스트 가능. 테스트 작성이 즐거워져서 커버리지가 자연스럽게 높아질 것 - AI 활용도 증가: 테스트 코드가 늘어나니 조금 더 편하게 AI를 활용할 수 있다. “내가 돌린 AI 때문에 기존 코드가 무너지지 않을까?” 하는 걱정 없이 AI를 활용할 수 있는 것이다
균형잡힌 평가: 만능은 아니다
클린 아키텍처가 만능은 아니다. 작은 프로젝트나 일회성 프로토타입에는 과할 수 있다. 초기 비용이 크기 때문이다.
하지만 우리 서비스처럼 외부 정책 변경이 잦고, 팀원이 여럿이며, 나처럼 프론트엔드와 서버 개발을 함께 하거나 장기 운영이 예정되어 있다면 초기 비용을 감수할 가치가 충분하다.
프론트엔드 vs 백엔드: Application 레이어의 필요성
같은 클린 아키텍처인데, 왜 프론트엔드와 백엔드의 레이어 구조가 다를까?
프론트엔드 (웹/모바일): Presentation → Domain ← Data (3계층)
백엔드: Presentation → Application → Domain ← Infrastructure (4계층)
이 차이는 각 환경이 다루는 책임의 차이에서 비롯된다.
백엔드: 복잡한 워크플로우 조율이 필요하다
백엔드는 여러 도메인을 조율하고 트랜잭션을 관리해야 한다. 주문 처리를 예로 들어보자.
// 백엔드: Application 레이어에서 여러 도메인을 조율
class ProcessOrderUseCase {
  async execute(orderId: number) {
    await db.transaction(async (trx) => {
      const order = await this.orderRepository.get(orderId);
      const payment = await this.paymentGateway.charge(order);
      await this.inventoryService.reserve(order.items);
      await this.deliveryService.schedule(order.address);
      await this.notificationService.send(order.userId);
    });
  }
}ts주문(Order), 결제(Payment), 재고(Inventory), 배송(Delivery) 등 여러 도메인을 조율하고, 트랜잭션으로 묶어야 한다. 이런 복잡한 조율 로직을 Domain에 넣기에는 너무 무겁다. 그래서 백엔드는 조율 전담 레이어인 Application을 따로 두는 것이다.
프론트엔드: 대부분 단순한 흐름이다
반면 프론트엔드는 단순한 흐름이다:
- 서버 API 호출
- 응답 데이터를 Entity로 변환
- Entity 검증 후 화면에 표시
비유: 웨이터는 손님의 주문을 주방(백엔드)에 전달하고, 완성된 요리를 서빙한다. 직접 요리를 만들지는 않는다. 주방장(백엔드)이 여러 요리사(도메인)를 조율해서 요리를 완성한다.
프론트엔드는 Domain 레이어의 Entity와 UseCase만으로 충분하다. Swift(iOS), Kotlin(Android), Flutter 같은 모바일 앱도 마찬가지다.
프론트엔드는 “얕은 Aggregate”만 유지한다
프론트엔드에서도 주문(Order)과 주문 항목처럼 중첩된 데이터가 필요할 때가 있다. 하지만 백엔드처럼 깊게 엮인 Entity 관계(Rich Domain Model)는 필요 없다. 얕은 Aggregate만으로 충분하다.
왜 얕은 구조로 충분한가?
백엔드는 주문(Order) → 결제(Payment) → 재고(Inventory) → 배송(Shipping)처럼 여러 도메인이 서로 의존하고 조율해야 한다. 하지만 프론트엔드는 서버가 이미 조율한 결과를 받아서 화면에 보여주기만 하면 된다. 복잡한 비즈니스 로직은 서버/UseCase에서 처리한다.
// ✅ 얕은 Aggregate: items는 interface 참조
interface OrderItem {
  id: string;
  name: string;
  quantity: number;
  price: number;
}

class Order {
  constructor(
    readonly orderId: string,
    readonly items: OrderItem[], // 인라인 타입 대신 interface 참조
    readonly totalAmount: number
  ) {}

  // ✅ 비즈니스 규칙 검증 (Boolean 반환)
  hasEnoughItems(): boolean {
    return (
      this.items.length > 0 && this.items.every((item) => item.quantity > 0)
    );
  }

  // ✅ 최소 수량 충족 여부
  hasMinimumQuantity(minQty: number): boolean {
    const total = this.items.reduce((sum, item) => sum + item.quantity, 0);
    return total >= minQty;
  }
}ts
// Mapper에서 DTO → Entity 변환 (items는 그대로 전달)
function mapOrderDtoToDomain(dto: OrderDto): Order {
return new Order(dto.order_id, dto.items, dto.total_amount);
}tsEntity 메서드는 Boolean만 반환한다. 계산이나 포매팅은 Presentation Layer에서 처리한다:
// ✅ Presentation Layer에서 계산 처리
function OrderSummary({ order }) {
  const totalQuantity = order.items.reduce(
    (sum, item) => sum + item.quantity,
    0
  );

  return (
    <div>
      <p>주문 번호: {order.orderId}</p>
      <p>총 수량: {totalQuantity}개</p>
      <p>총 금액: {order.totalAmount.toLocaleString()}원</p>
    </div>
  );
}js
핵심은 “조율이 아니라 변환”이다
백엔드의 Application은 여러 도메인을 조율한다 (주문 → 결제 → 재고 → 배송).
프론트엔드는 서버가 조율한 결과를 Entity로 변환만 하면 된다. 복잡한 비즈니스 규칙은 서버/UseCase에서 처리한다.
핵심 차이
| 구분 | 백엔드 | 프론트엔드 |
| --------------- | -------------------------- | ------------------------------------- |
| 레이어 수 | 4계층 (Application 포함) | 3계층 (Application 없음) |
| 트랜잭션 | 여러 DB 작업 묶기 필요 | 없음 (서버에서 처리) |
| 도메인 조합 | 주문+결제+재고+배송 조율 | 서버가 조율한 결과만 받음 |
| Entity 관계 | Rich Domain Model | 얕은 Aggregate (plain object 중첩) |
| 예외 케이스 | - | 오프라인 앱 등 특수한 경우 4계층 가능 |
백엔드는 복잡한 워크플로우를 조율해야 하므로 Application 레이어가 필요하다. 프론트엔드는 서버가 조율한 결과를 표시하는 역할이므로 대부분 3계층만으로 충분하다.
예외: Notion, Google Docs처럼 로컬 DB와 서버 DB를 동기화하거나, WebSocket + REST API 조합, 여러 외부 SDK를 조율해야 하는 특수한 경우에는 프론트엔드도 4계층 구조를 사용할 수 있다.
핵심 정리
클린 아키텍처를 한 문장으로 정리하면: 역할을 분리해서 변경에 강한 구조를 만드는 것이다.
3개 핵심 레이어 (Swift/Kotlin/Flutter와 동일)
핵심 레이어:
- Presentation (UI 상호작용) - 훅과 컴포넌트로 UI 관리
- Domain (비즈니스 규칙) - 검증 로직, 엔티티, 유스케이스 등 핵심 로직
- Data (외부 데이터 변환) - API 호출 + DTO ↔ Entity 변환
보조 구성요소:
- DI (의존성 주입) - 모든 레이어를 조합하고 주입
- Infrastructure (외부 세계 격리) - HTTP 클라이언트, 스토리지 등 외부 도구 추상화
- Core (공통 기능) - 모든 레이어에서 쓰는 순수 유틸리티
핵심 원칙 5가지
- Domain은 완전히 독립 - 다른 레이어를 import하지 않음
- 의존성은 항상 안쪽으로 - Presentation → Domain ← Data
- Entity는 불변 - 서버가 상태의 주인, 프론트엔드는 검증만 담당
- DTO와 Entity는 분리 - 택배 상자(DTO)를 뜯어서 상품(Entity)을 꺼낸다
- 변환은 Mapper가 유일 - DTO ↔ Entity 변환은 Mapper만 통과
Data Layer의 책임 분리
Repository는 두 가지 책임을 분리한다:
- DataSource: API 호출만 담당 (엔드포인트 관리)
- Mapper: DTO ↔ Entity 변환만 담당 (서버 변경 흡수)
이렇게 분리하면 서버 변경 시 영향 범위가 명확하다:
- API 엔드포인트 변경 → DataSource만 수정
- 응답 필드명 변경 → Mapper만 수정
아키텍처는 도구다, 작품이 아니다
클린 아키텍처를 도입하기 전에 명심해야 할 것이 있다.
완벽한 아키텍처는 존재하지 않는다. 오늘의 요구사항에 맞는 구조가 있을 뿐이다.
6개월 뒤 요구사항이 바뀌면? 구조도 바뀔 수 있다. 그게 자연스러운 것이다. 아키텍처는 변경을 위해 존재한다. 변경을 막기 위한 것이 아니다.
클린 아키텍처의 진짜 가치는 “완벽한 구조”를 만드는 것이 아니라, 변경하기 쉬운 구조를 만드는 것이다. 레이어를 나누고 책임을 분리하는 이유도 결국 하나다. 6개월 뒤에도 두려움 없이 코드를 고칠 수 있도록.
그러니 처음부터 완벽하게 만들려 하지 마라. 오늘 필요한 레이어부터 시작하고, 필요할 때 확장하면 된다. 코드는 당신을 위해 존재한다. 완벽하지 않아도 괜찮다.
언제 도입하면 좋을까?
다음 상황이라면 클린 아키텍처가 빛을 발한다:
- 기획이 자주 바뀌는 서비스
- 6개월 이상 운영할 프로젝트
- 테스트 코드가 필요한 경우
- 프론트엔드와 백엔드를 함께 개발하는 경우
프론트엔드 vs 백엔드, 왜 레이어 수가 다를까?
Swift, Kotlin, Flutter 같은 모바일 앱도 기본적으로 3계층 구조를 사용한다.
프론트엔드(웹/모바일)는 서버가 조율한 결과를 받아 표시하는 역할이므로 일반적으로 Application 레이어 없이 3계층만으로 충분하다. 복잡한 엔티티 관계(주문-주문항목, 사용자-권한 등)도 Domain Layer의 Entity 참조로 해결할 수 있다.
반면 백엔드는 여러 도메인을 조율(주문+결제+재고+배송)해야 하므로 일반적으로 Application 레이어가 필요하다.
이 글을 읽은 당신이 내일 할 일
클린 아키텍처가 필요해 보이는가? 하지만 이것은 선택이다.
좋은 아키텍처를 선택한다고 자동으로 좋은 서비스가 만들어지는 것은 아니다. 아키텍처는 도구일 뿐이다. 다만 올바른 아키텍처는 시간이 지날수록 코드를 더 견고하게 만들고, 변경을 더 안전하게 만드는 데 도움을 준다.
가장 중요한 것은 팀의 합의다. 혼자 결정하지 말고, 팀원들과 함께 다음 질문들을 논의해보자.
1. 팀과 먼저 논의하자
아키텍처는 혼자 결정하는 것이 아니다. 팀원들과 함께:
- 현재 어떤 문제가 있는지 공유하고
- 클린 아키텍처가 그 문제를 해결할 수 있을지 논의하고
- 팀 전체가 동의할 때만 시작하자
합의 없이 시작하면 오히려 팀에 부담이 될 수 있다.
2. 프로젝트 상황을 판단해보자
팀이 동의했다면, 프로젝트 상황을 함께 살펴보자:
- 6개월 이상 운영할 프로젝트인가?
- 기획 변경이 빈번한 서비스인가?
- 여러 명이 협업하는 코드베이스인가?
하나라도 “예”라면 시도해볼 가치가 있다. 하지만 모두 “아니오”라면, 더 단순한 구조가 나을 수 있다.
3. 작은 부분부터 시도해보자
처음부터 전체를 바꿀 필요는 없다. 가장 자주 바뀌는 부분 하나만 골라서 시작하자:
- API 변경이 잦다면 →
Data레이어부터 - 비즈니스 규칙이 복잡하다면 →
Domain레이어부터 - UI가 자주 바뀐다면 →
Presentation레이어부터
작은 성공 경험이 쌓이면, 자연스럽게 확장할 수 있다.
마지막으로
클린 아키텍처는 만능이 아니다. 좋은 아키텍처를 선택한다고 해서 자동으로 좋은 제품이 만들어지는 것은 아니다. 비즈니스 가치, 사용자 경험, 팀 문화 같은 것들이 훨씬 더 중요할 수 있다.
그럼에도 클린 아키텍처를 선택하는 이유는 시간이 지날수록 유리해지기 때문이다:
- 변경하기 쉬워진다: 요구사항이 바뀌어도 수정 범위가 명확하다
- 테스트가 쉬워진다: 의존성이 분리되어 있어 테스트 작성이 간단하다
- 협업이 편해진다: 레이어 구조로 팀원들이 동시에 작업할 수 있다
- 두려움이 사라진다: “이거 고치면 어디 터질까” 걱정 없이 코드를 수정할 수 있다
초기에는 파일이 많아지고 복잡해 보일 수 있다. 하지만 6개월, 1년이 지나면 이 구조가 얼마나 견고한지 체감하게 된다.
완벽한 아키텍처는 없다. 오늘보다 조금 나은 구조를 만들고, 팀과 함께 점진적으로 개선해나가자. 그것으로 충분하다.